Build a Basic Table Saw Outfeed Table
Christian Becksvoort's outfeed table is durable, versatile, and easy to build.
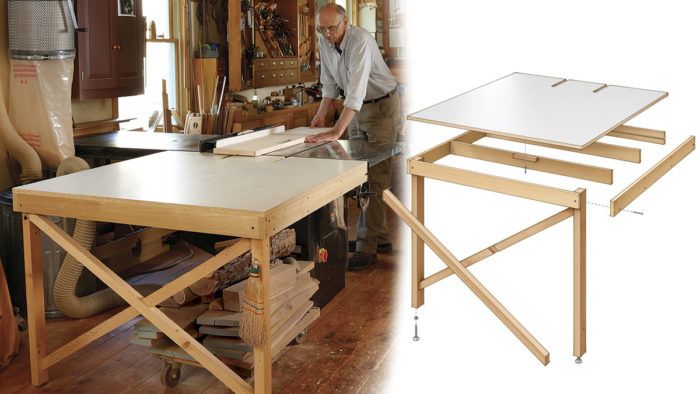
Synopsis: This outfeed table is simple, functional, and versatile. And although you can find fancy outfeed tables with drawers, doors, or other embellishments, this is really all you need, whether you’re adding capacity to your tablesaw table or using it as a drawing surface or a glue-up station. Made of melamine-covered particleboard, it has two legs reinforced with cross-pieces, and attaches simply to the tablesaw, either via a groove that mates with the saw’s angle iron or by being bolted to the flange. The size is up to you, based on the work you do.
If you own a tablesaw and make anything bigger than miniatures, you really need an outfeed table. There are plenty of articles on making outfeed tables equipped with a variety of cubbyholes, doors, and drawers. That’s a great idea, especially if you’re in need of additional storage space and have the extra time to devote. However, if you just want a quick, dependable, and versatile alternative, I have one. The simplest outfeed table is nothing more than a flat surface and two legs. It shouldn’t take more than a few hours to build and will serve you for decades.
Your choice of materials for the top adds to the versatility of this outfeed table. My first two choices are 3⁄4-in. plywood covered with Formica, or melamine-faced particleboard. I often use mine for assembly, and dried glue pops right off these surfaces. I’d go with white, off white, or light gray because I also use my outfeed table as a whiteboard to lay out angles or draw full-size details. Pencil wipes off easily.
Size your outfeed table to fit your needs
You don’t have to build your outfeed table to the same dimensions as mine. Decide on the width and length of the tabletop based on your saw, what kind of work you do, and how much room you have in your shop. The cast-iron top of my tablesaw is 44 in. wide, so that’s the width I chose to make my outfeed table. If you have room to the right of the saw and work with lots of sheet goods, feel free to make the table wider. For me, 48 in. is a convenient length. Added to the 30 in. of the saw table itself, that gives me more than 6 ft. of flat surface to work on.![]()
Build the frame first, then add the top
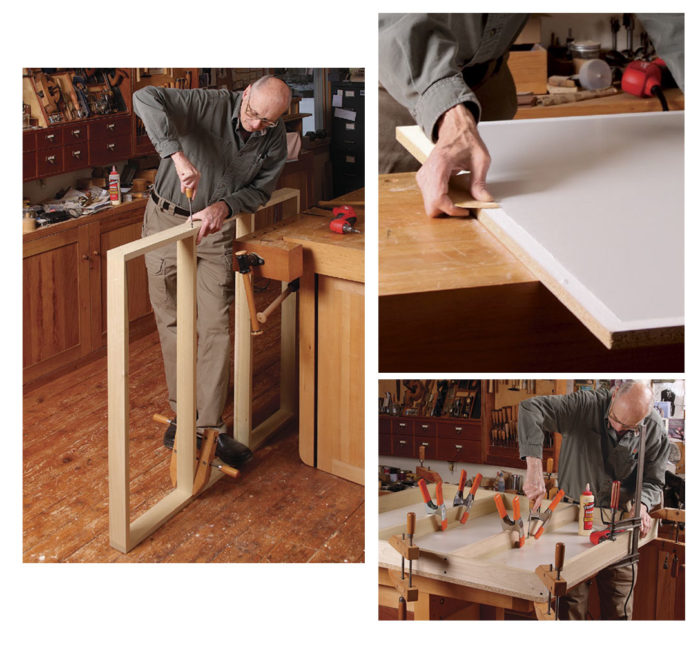
Start by making a frame out of 3/4-in.-thick by 3-in.-wide hardwood. The corners can be nailed, rabbeted, screwed, glued, or even dovetailed. I use screws. For my size table, once the frame is together I add two internal crosspieces, roughly 15 in. apart, for added strength. These can be screwed in place from the outside of the frame. Sight across the top of the frame to be sure that the entire top is in the same plane.
If you are using plywood or MDF for the top, cut the piece to size and glue, nail, or screw it to the frame. Now glue on the Formica surface. If you are working with sheet material with a factory-applied melamine surface, just glue and clamp the panel to the frame.
The outfeed table can be attached to the saw in one of two ways. If your saw has an angle-iron fence system front and back, cut a groove along the leading edge of the outfeed table’s frame. I cut it on the tablesaw with the tabletop standing on end, using a dado blade, a featherboard, and a high fence. If the saw table has no angle iron, you can bolt the outfeed table to the flange of the saw table. Next, cut two slots into the top aligned with your saw’s miter-gauge slots. Measure from the edge of the tablesaw to locate the slots. Cutting the slots with a 1-in. router bit gives me a bit of leeway when aligning them to the tablesaw’s 3⁄4-in. miter slots.
Move on to the leg assembly
Once the top is made and the slots are cut, add the two legs. They are easy to make from 1-1/2 in. thick by 3-1/2 in. wide stock, cut about 1 in. shorter than the distance from the underside of the top to the floor. Undersizing them gives you space to add T-nuts and levelers. Drill the appropriate size hole into the bottom of each leg, insert the T-nut, and then thread in the levelers. I get mine from Rockler (nos. 49869 and 24315).
The legs are attached into the far corners of the table, clamped and then screwed through the frame from the outside. The 1-1⁄2-in. edge goes to the end, with the 3-1⁄2-in. face parallel to the sides. If your frame parts were cut square, the legs should stand plumb. Two 1-1⁄2-in.-thick by 1-1⁄2-in wide pieces are used diagonally as cross-braces between the legs. With the table upside down, I locate the top end of the cross-braces to rest just above the underside of the frame. I use a half-lap joint at the intersection for stability, and screw the cross-braces between the legs.
Attach the outfeed table to the saw
If your tablesaw has angle iron, turn the outfeed table right side up, and slide the groove at the front edge onto the angle iron at the rear of the saw. I leave the table loose, so I can slide it along the angle iron if I need to get around the table for a glue-up. But most of the time it just rests in place with its miter-gauge slots aligned with the miter slots on the tablesaw.
If your saw has no angle iron, drill two holes through the wood frame, put the outfeed table in place, clamp or shim it to align the miter-gauge slots, and transfer the holes in the wood frame to the flange of the tablesaw. Drill two 5⁄16-in.-dia. holes through the flange. The cast iron drills pretty easily. Use 1⁄4-in. bolts and nuts to attach the outfeed table to the saw.
Finally, use a long straightedge to be sure that the outfeed table is a smidge below the saw table, and raise or lower the support legs to align the two surfaces. This ensures that whatever you’re cutting won’t catch as it passes from saw table to outfeed table.

From Fine Woodworking #272
To view the entire article, please click the View PDF button below.
Fine Woodworking Recommended Products
Makita LS1219L Miter Saw
DeWalt 735X Planer
Freud Super Dado Saw Blade Set 8" x 5/8" Bore


Comments
I built a similar extension table for my table saw that works really well. The plans for this extension has the top of the extension flush with the frame on all sides. I suggest extending the top beyond the frame where it meets the table saw. The extension should equal the depth of the angle iron and bolts so the top fits flush to the top of the table saw.
Log in or create an account to post a comment.
Sign up Log in