Workshop tip: Modular storage system adjusts to fit cargo
Quick-to-make, adjustable cabinets will hold a variety of tools and equipment.
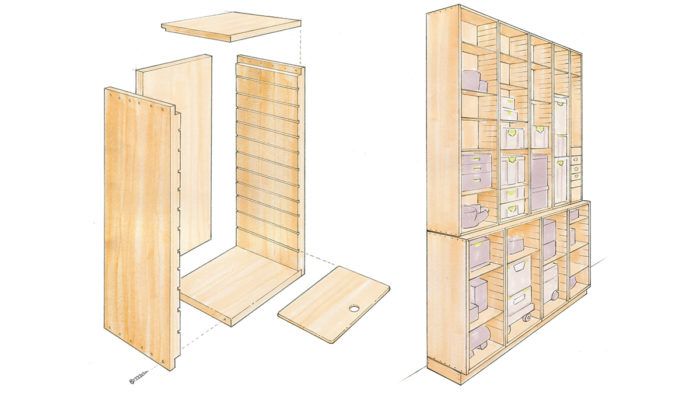
Like most woodworkers, I have a place for every machine but no good home for my large stash of power tools: sanders, routers, saws, drills, and so on. After years of tripping over stacks of cases, I got frustrated enough to do something about it.
I wanted everything in one central, easy-to-access location. I also wanted my storage system to be adjustable, since it’s almost impossible to know what tools I may add or subtract down the road. These quick-to-make cabinets fill the bill perfectly.
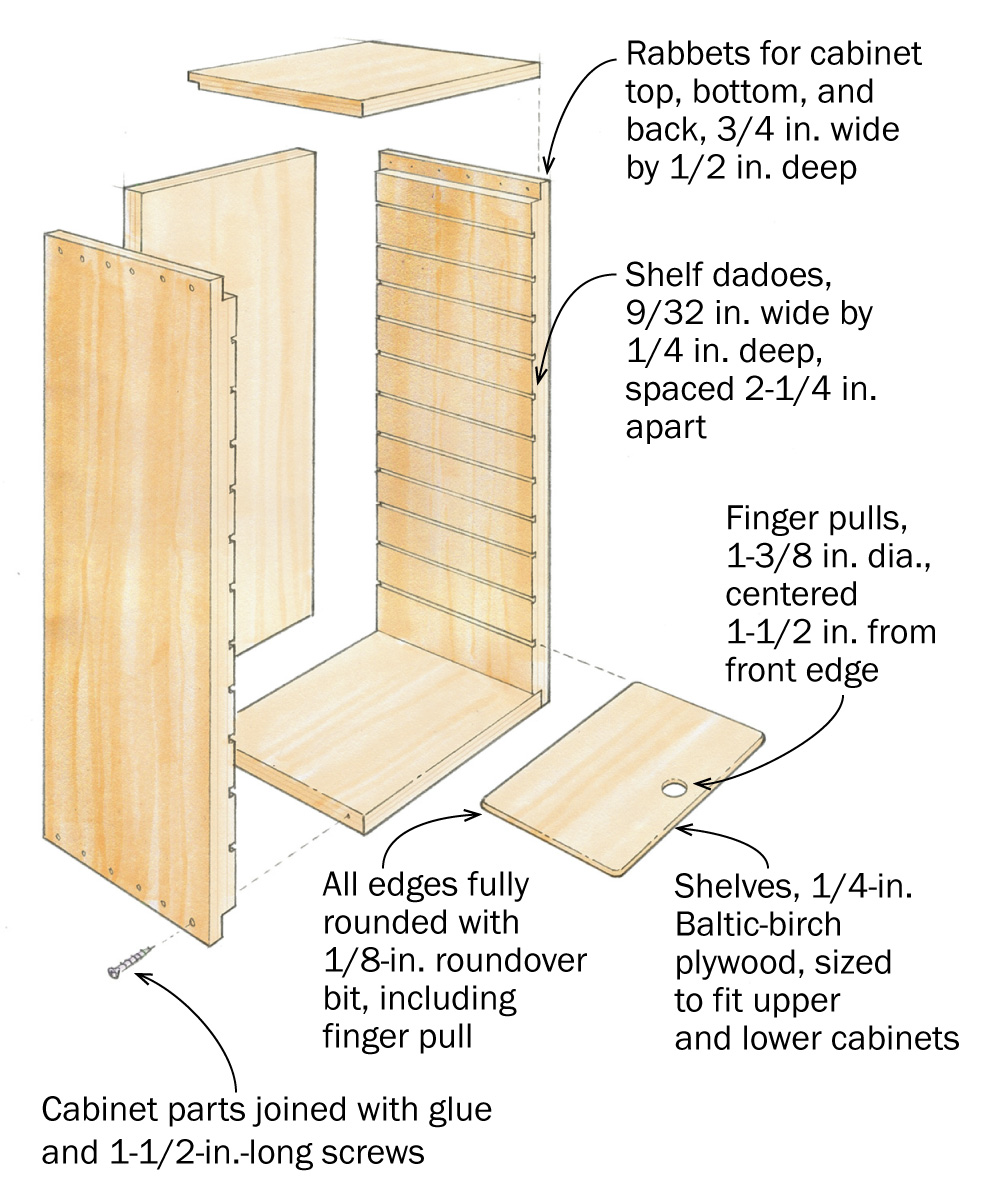
The modular system is made up of simple plywood cabinet boxes that can be of any size, screwed together in any array. Rows of 1/4-in. dadoes inside each box let you slip in 1/4-in.-thick plywood panels that act as adjustable shelves. I drilled a fingerpull hole at the front of each shelf to make it easy to move.
While cabinets like these can be as tall as your plywood is long, it’s more helpful to build them in two stacked banks, letting you alter the depth and width of the bays to suit the contents. In my case, there’s an upper, 60-in.-tall bank of five units, sized to fit my large collection of Festool Systainers and similar aftermarket cases for other tools; and a lower, 40-in.-tall bank of four wider units that holds everything else.
The cabinet sides and backs are 3/4-in. (18mm) Baltic-birch plywood joined with glued-and-screwed rabbets, and the shelf dadoes are slightly oversize for easy sliding. I cut all the rabbets with one setup on the tablesaw using a stacked dado head, and I cut the shelf dadoes on my crosscut sled. Before screwing the boxes to each other, make a simple toe-kick base from plywood strips, level it with shims, and screw it to the wall and/or floor. Then set the cabinet boxes on top, join them with 1-1/4-in.-long screws, and anchor them to the wall.
To make the shelves better looking and easier to adjust, I gave all of the edges a 1/8-in. roundover—including the 1-3/8-in.- dia. finger pull—running them over the router table in all directions to create fully rounded edges.
The system has worked well, and can be expanded as far as your wall space will allow.
—CLARK KELLOGG, Houston, Texas
Illustrations by Dan Thornton
From Fine Woodworking issue #287
Fine Woodworking Recommended Products

Woodriver Rechargeable Desiccant Bag
WoodRiver Router Bit Storage Case



Comments
Looks great, but my shop is 1/2 of a 2 car garage with a concrete floor. I have no room for such a massive cabinet. I have other storage options in the shop.
So I have to say "thanks, but no thanks."
If you are starting from scratch, it would be a great way to setup your shop.
My thoughts exactly. The upper on my workbench from the Norm Abrams plan is pretty similar, but I’ve got way too much other stuff to put in there than to fill it with plastic clamshells; those are tossed in the attic.
This is exactly what I was looking for—a modular structure that I can adjust to accommodate my workshop. I plan to break up the shelving into smaller size cabinets that will fit into various nooks and spaces around the shop. Thank you sharing.
A few thoughts:
- You don't want the cabinets so wide that the shelves sag, and *taller* items weigh more. So for the shelves I personally might go with 3/8" or 1/2" plywood instead of the 1/4" baltic that he uses. That would allow wider cabinets and thus fewer cabinet sides with the dadoes.
- Instead of cutting lots of dadoes in the cabinet walls, you could just nail/glue thin strips of plywood horizontally inside the cabinets, spaced to create "dadoes" for the shelves.
Log in or create an account to post a comment.
Sign up Log in