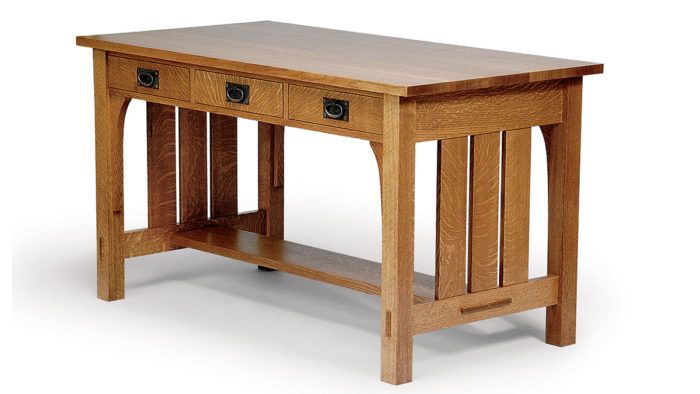
An Arts and Crafts Library Table
A nontraditional approach to building a desk with drawers.

Synopsis: This author builds tables with drawers faster and stronger by building frames to go over and under the drawers and attaching them to pre-assembled ends. He advises that best boards go on top, and he glues those up first so he knows what he’s working toward. Then he assembles the ends, attaches the frames and shelf and installs drawer glides. The article offers detailed instructions on the table end glue-up, the shelf and drawer assembly, and the installation of drawer blocking and glides.
I’ve never seen the virtues of building a table with drawers in the traditional way—with a double-tenoned stretcher below the drawer and a dovetailed top rail. It just seems like unnecessary work. I’ve developed methods for building a table with drawers that are faster and, to my mind, stronger. It’s the same approach I use when building a chest of drawers. I build frames to go over and under the drawers, then simply attach them to preassembled ends. This approach makes the entire project more manageable and all but guarantees a smooth and square glue-up.
This library table is adapted from various Stickley catalogs from the turn of the 20th century. It would work well as a writing desk or as a reading table. My approach to the construction of this traditional Arts and Crafts piece is straightforward. I used quartersawn stock, hand-hammered hardware and a slightly lighter finish than is customary for this style.
The Best Boards Go On Top
For this project, I ordered 100 bd. ft. of oak, then riffled through to choose boards for specific parts. Once all of the boards had been surfaced, I designated the best of the lot for the tabletop, which I typically glue up first so that I know what I’m working toward. I also sorted all of the other lumber, denoted which pieces will be used where and milled them to their finished thickness.
The less-attractive lumber was designated for interior parts, such as the two frames. These frames are identical to face frames on an ordinary plywood cabinet, but they have a very different use. Just as on a chest of drawers, the frames span the two ends, and drawers are housed between them. I built the frames using biscuit joinery, but mortise-and-tenon joinery would work, too. Once installed, the frames will be joined in so many ways that the chance of their failing is negligible, if not impossible. I left the frames slightly oversized to be squared up later.
From Fine Woodworking #149
For the full article, download the PDF below:
Fine Woodworking Recommended Products

Compass

Drafting Tools

Stanley Powerlock 16-ft. tape measure


Comments
There are numerous mistakes or should I say differences between the glossy pamphlet that comes with the plans and the set of drawings. Such as the tennon in the lower rail that the shelf goes through. The full sized drawing shows the through tennon on the lower rail that goes through the leg to be 1 3/4" while the glossy shows it at 2 1/2". There is another mistake between the two plans in the length of the lower rail. If you are going to build this desk double and tripple check everything.
Other mistakes have been made on the PDF plan that accompanies this project, if you look at the side view of the drawings it states that the total width of the side assemblies are 26-1/4" from front to back but I have found that that actual width is 21-1/4", because the lower rail which has through tenons is also only 21-1/4" … if you are going to be submitting plans to complete this project please make sure that they are accurate. I needed to purchase large amounts of wood for his project and now I need to wait until I can purchase more. Wood is not cheap.
I think I will b=need to make my own plans to determine all dimensions instead of taking these plans at face value. 5" is a huge difference.
Ed,
We just looked over everything–double and triple checking–and the measurement that you're referencing is in fact correct. The overall assembly is 26-1/4 in. The drawing shows the shoulder to shoulder measurement, which is 21-3/4 in. With the legs at 2-1/4 in. thick, it adds up.
The other comment from Randy is half accurate. There is a discrepancy between the drawing and article in regards to the height of the tenon–which should be 2 1/2 in. That error should not effect lumber purchasing.
Thanks for your response .. I see usually when I design plans I make workpiece dimensions and not “ Shoulder to Shoulder” dimensions .. I usually also do a clip mask of the joinery to show the dimensions of the tenon .. but I stand corrected .
Understood. We do make mistakes from time to time, but we really try and make drawings have the right information, where it's needed. In this case, shoulder to shoulder makes a lot of sense because the upper and lower have the same shoulder to shoulder measurement, but different overall measurements since the top tenon is not through. The rails can be made with the same setup, then the upper rail tenon can be trimmed off. This allows multiple parts to be made using the same setup, therefore more accurate.
Article says "CAD-drawn plans and a cutlist for this project are available in the Fine Woodworking store". But cannot find it there. Is it still available? A url would be appreciated.
I had ordered these plans and am the 80% mark on the desk but in a recent move they were misplaced. Cannot find them here anymore either. Does anyone have a copy of the plans? Thanks, More
I would also like to know if the CAD-drawn plans and cutlist are still available. Thank you.
Ben will know better but I expect the printed CAD-drawn plans are no longer available and there may never have been a cutlist.
If I were going to build this piece I would first take the time to create my own 3D digital model to check the dimensions and resolve any mysteries.
Sorry, I've never come across cad drawing or a cut list for this project.
Log in or create an account to post a comment.
Sign up Log in