5 Ways to Attach Tabletops
Time-tested methods for connecting the top to the base while allowing for seasonal wood movement.
Synopsis: To avoid a cracked tabletop, attach it in a way that allows for seasonal movement. Garrett Hack details five solutions. He offers a quick guide to how and why wood moves; then he explains the five methods: pocket holes (for small tables), screw blocks, buttons, dovetail blocks, and metal fasteners. He includes reasons to use each method and talks about their disadvantages, too.
I’ve repaired quite a few antiques, many of them tables with cracked tops. And the reason for the crack is always the same: The top had been attached to the base without any allowance for the wood to move.
Properly attached, a tabletop can expand and contract with changes in humidity while staying flat and firmly connected to its base. Tables that are properly connected gain strength from their connections, the top lending rigidity to the base and the base reinforcing the top.
Of the five common methods of connecting tabletops to their bases covered here, four of them are shopmade and one of them relies on commercially available metal clips. Which of these methods is appropriate depends on the size of your table, its construction and, perhaps most important, on your tastes and preferences. Each has its place and, in some instances, a combination of them may be the best solution.
By the way, these methods have applications beyond connecting tabletops to bases. They’re just as useful for attaching tops to chests of drawers, desks and other case pieces.
Accounting for wood movement
Wood moves. Sometimes it moves a lot. Most of the expansion and contraction takes place across the grain, whether the boards have been flatsawn or quartersawn. On average, quartersawn wood moves a little less than half as much as flatsawn. Wood hardly moves at all in length. (For a good discussion of wood movement and other properties of wood, see Understanding Wood: A craftsman’s guide to wood technology by R. Bruce Hoadley, The Taunton Press, 1980.)
If you’re making a leg-and-apron table with a solid-wood top, this means that you have to allow the top to move independently of the base. On small tables (say, 18 in. or less in a relatively stable wood, like cherry), the movement of the top is slight and can almost be ignored. On wider tables, however, you need to allow for some significant movement—especially if you live in a part of the country with big swings in humidity.
To help me gauge how much movement I can expect, I keep a few short, wide boards around. Every three weeks or so, I’ll mark the date and width of these boards right on the boards. This gives me a running record of actual wood movement (not theoretical movement) in my part of the country on some of the species that I use most often. I’ve been doing this for a few years now, so I have a pretty good idea of how much movement to allow for when I build a piece.
For the sake of clarity, I’ll explain these attachment methods on a simple table of legs and rails, but the methods work just as well on more complex structures with internal cross rails or strongbacks. I often use more than one kind of attachment on the same piece, taking advantage of each method’s strengths to suit my particular design.
Whichever method I choose, I attach the top to the side rails (the side perpendicular to the grain in the top) every 4 in. to 8 in., starting quite close to the leg. For the front and back rails, I generally use only about half as many attachments. That’s because the movement in most rectangular tops is across the grain, front to back. By attaching the top at more points along the side rails, I can keep the top from curling or cupping. Fewer attachments at front and rear mean that those rails can bow slightly, if necessary, as the top moves with seasonal changes in humidity.
Pocket holes: a simple solution for small tables
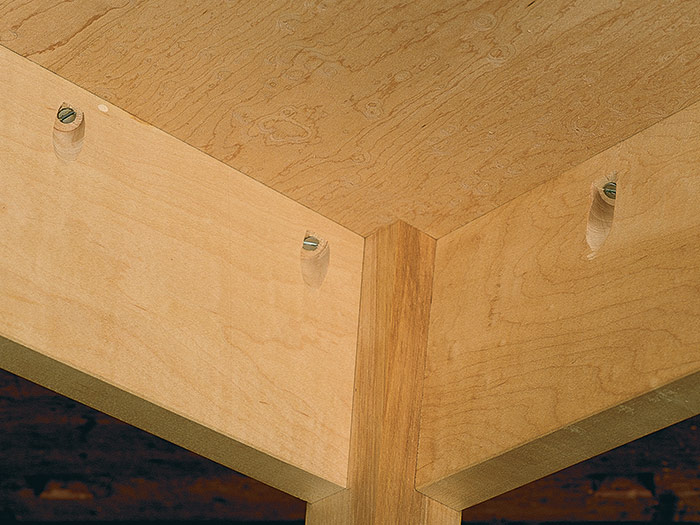
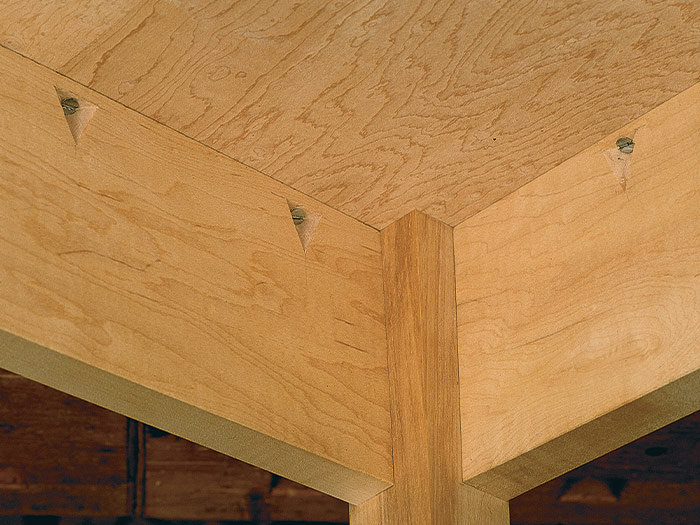
Pocket holes are holes bored at an angle, usually about 10°, through a rail for a screw that connects the base and the top. Actually, two holes are drilled. One provides a seat for the screw head, and the other, a pilot hole, prevents the screw from splitting the rail or the top.
Pocket holes are easy to make and provide a positive connection between top and base. Their biggest liability is that they don’t allow the top to move much. Pocket holes are best suited to smaller or shallower tables where the top isn’t wide enough to produce much movement.
Pocket holes can be made to allow for more movement by drilling slightly oversized pilot holes or by making the holes oval in the direction of movement. I use a small round or rat-tail file to do this. I often attach the front edge of a top securely with a couple of screws through pocket holes and then progressively enlarge the screw holes the farther away from the front rail I go. On other table designs, where I want the movement roughly equal on either side of the center of the top, I fix the top securely in the middle of the two short rails. Half the movement of the top will be toward the front of the table, the other half toward the back.
Another drawback to using pocket holes on wider tabletops is that oversizing or “ovalizing” the screw holes in the back rail can be quite time-consuming and will weaken the back rail as well. The rail can be strengthened by gluing another rail to it, or you can avoid the problem altogether by just using another kind of connector here.
On shallow tables with long rails, I have sunk one or more screws through pocket holes in the back rail, well away from the legs. This allows the rail to bow in and out slightly with the changes in humidity.
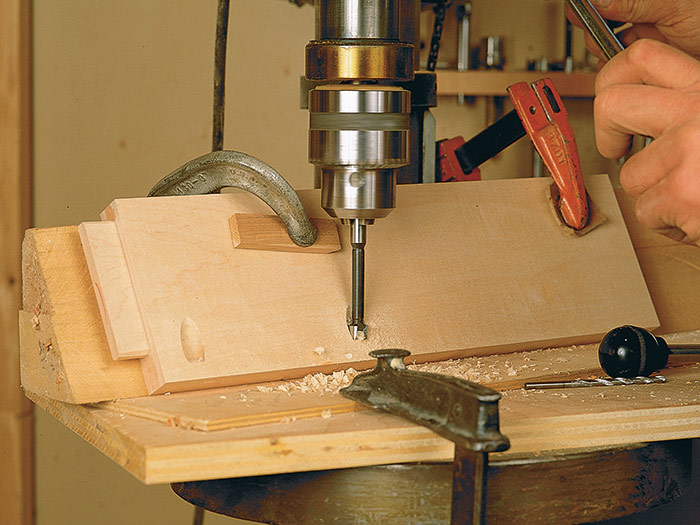
I usually drill my pocket holes on the drill press, using a simple fixture that positions the rail at about 10° off vertical. I drill the pocket with a Forstner bit and then follow up by drilling the screw hole with a twist bit of appropriate size. You can buy bits that do both operations simultaneously, but they don’t do the job as cleanly.
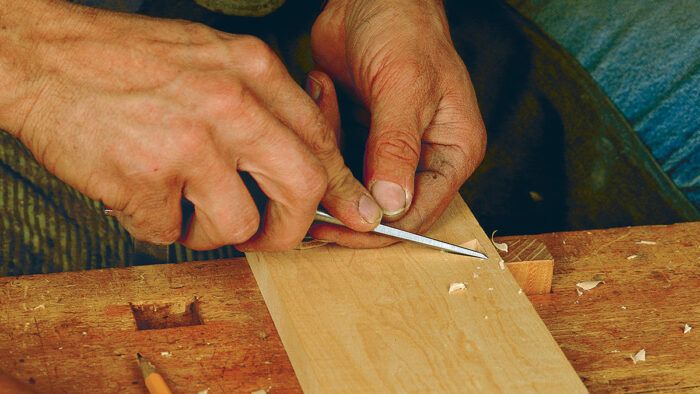
For a nice touch, especially on a period table, the seat for the screw head can be cut with a chisel by making a V-shaped cut into the apron at an angle and leaving a small flat at the bottom for the screw head. First efforts aren’t usually great, but you’ll get it down if you do a few trial cuts on a piece of scrap.
Screw blocks: quick and convenient
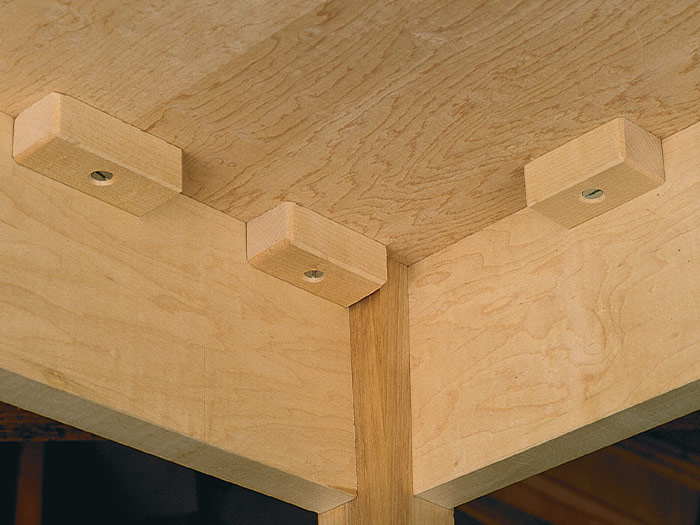
Screw blocks are small blocks of wood glued to the rails, flush with the upper edge, and then screwed to the top. They work like pocket holes, so on wider tabletops, the hole through the block should be oval on the side of the block against the top. Screw blocks, like pocket holes, make very secure connections.
One of the main advantages of using screw blocks is that they can be made, fitted and installed near the end of the construction process; most of the other methods require that you either drill or mortise the rails before gluing up the base.
Screw blocks sometimes work in situations where drilling pocket holes is awkward or impossible—for example, where a large drawer fills most of the space between rails. Screw blocks actually can strengthen the whole structure if they’re glued between the drawer guides and the table’s rails. I’ve used screw blocks successfully with extension tables by placing them between the rails and extension slides.
Also, screw blocks can allow greater movement than pocket holes. To do that, cut a slot all the way through the blocks in the direction of wood movement in the top, and use a roundhead screw and steel washer instead of a bugle-head-style screw. With their holes elongated, screw blocks are useful for wider tops that move a lot seasonally.
Buttons: elegant solution for tables large and small
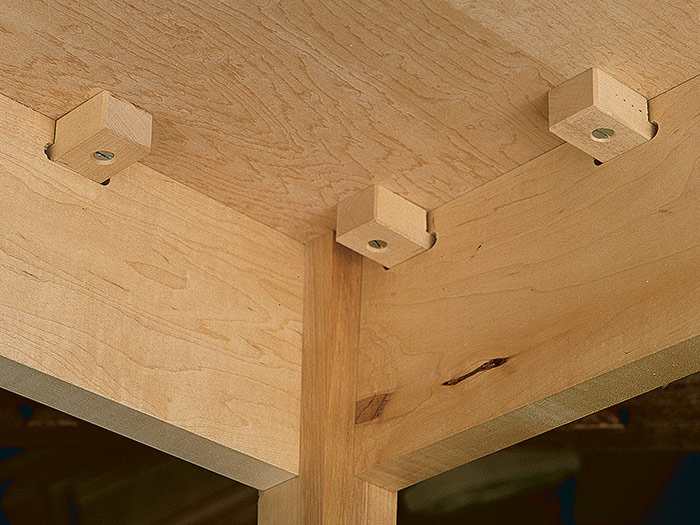
Buttons are small blocks of wood tenoned on one side of one end, creating a half-lap joint that engages a slot cut into the rail. The buttons are screwed to the tabletop.
Buttons are my preferred method of attaching tabletops because they’re easy to make and install. They work well in many situations, and they make a secure connection. Their major advantage over other methods is that they allow a lot of movement in two directions, both along the rail and perpendicular to it. I avoid using them only when there is too little space, such as where a drawer uses the back rail as its stop.
When I use buttons, I locate and fix the top either at the front edge or in the center, depending on what kind of table it is, using a pocket hole or screw block. This helps me control where the seasonal movement of the wood will occur.
Buttons can be made from most any hardwood, but maple, birch and ash are my favorites because of their strength. I cut the tenons on buttons to roughly half the button’s thickness and about 1⁄4 in. to 3⁄8 in. long. Overall, the buttons are approximately 3⁄4 in. thick, 1 in. wide and 11⁄2 in. to 2 in. long, with the grain running the button’s length.
I cut the button mortises in the rails before assembling the base, either by hand with chisels or, more often, with a slot mortiser. You also could use a plunge router or cut the slot mortises after assembly with a router and bearing-guided slotting bit by running the router along the top of the rail. This method works particularly well on curved rails because it lets you cut the mortises after the leg-and-rail assembly has been leveled and trued.
I position the mortises slightly lower on the rail than the space between the top of the button and the top of the half lap would indicate. This causes the buttons to fall slightly below the top of the rail so that when the buttons are screwed to the top, the connection is very tight. I’ve seen buttons engage a groove the length of the rail, but this can weaken the table. I also keep the buttons slightly away from the legs, so the leg-to-rail joint won’t be weakened.
If I’ve secured the tabletop at the front so that all movement is to the back of the table, I make the mortises in the rear rail slightly deeper and the corresponding tenons slightly longer than those on the sides. Then I position the shoulders of the buttons’ half laps away from the rail a bit, and I take care not to seat the end of the buttons’ tenons. This allows for more movement where it’s most needed.
Dovetail blocks: best method for lots of movement
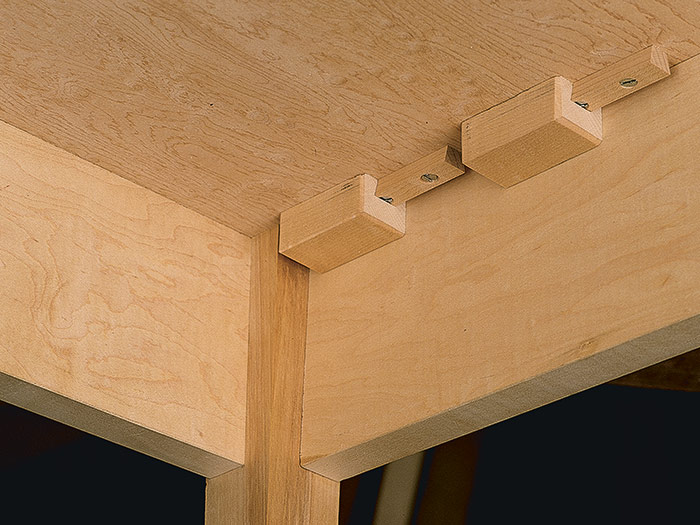
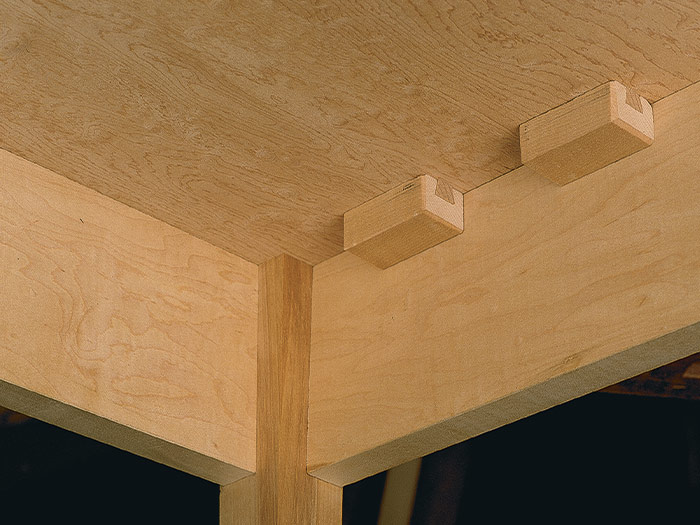
Dovetail blocks are two-part connectors. A dovetail-shaped piece is screwed to the top, and a block with a corresponding slot is glued to the rail. Their primary advantage over other methods is that they allow for a great deal of wood movement, making them best-suited to wide tops on tables with straight rails. They’re fairly time-consuming to cut, fit and install, but they work well and make a good connection.
When I cut dovetail blocks, I make sure I have a good fit between the pin blocks and slot blocks. The blocks shouldn’t bind or be sloppy. I cut the slot on a router table and then cut the stock into 2-in.- to 3-in.-long pieces. I rip the pin blocks slightly oversize on the tablesaw and then handplane them to get a perfect fit. I secure these blocks to the top with two screws and then glue the slot blocks to the side rails. For the front and back rails, the slot blocks are mortised into the rails or another type of connector is used, such as screw blocks or buttons.
Metal fasteners: simple, not elegant
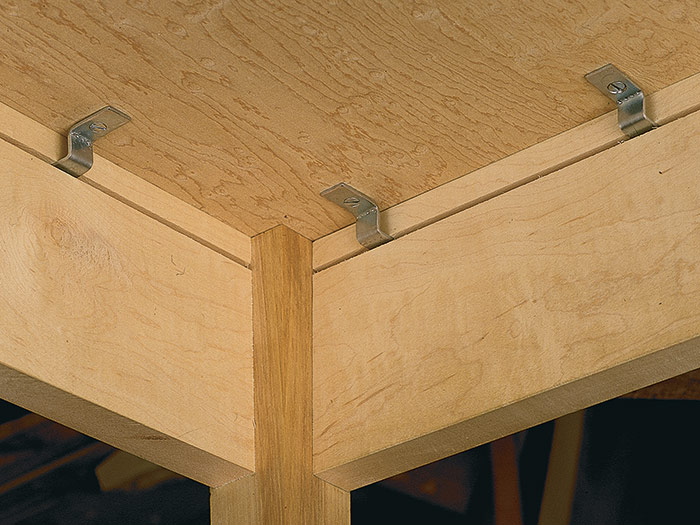
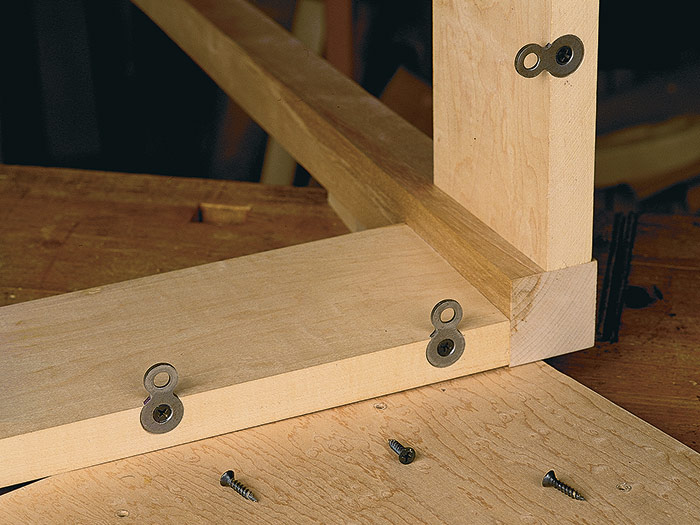
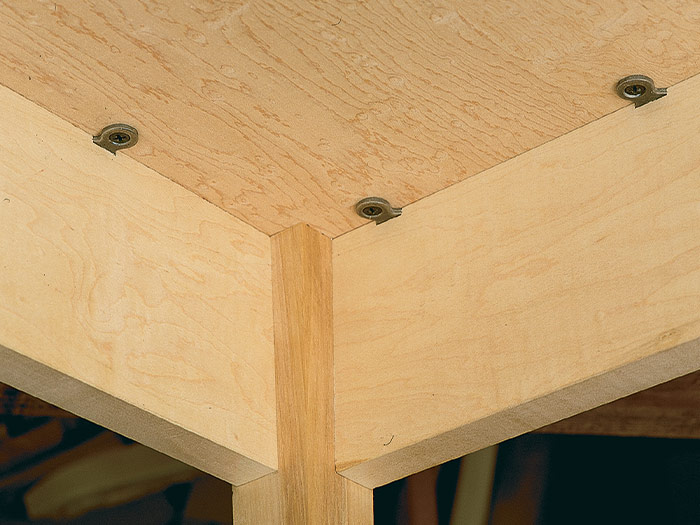
Two types of metal fasteners are widely available. One is a figure-eight style, and the other is a clip that looks like a squared-up “Z”. Both fasteners are inexpensive, easy to install and plenty strong for most applications.
The Z-clip functions exactly like a wooden button, with one offset let into a sawkerf near the top of the rail and the other screwed to the top. These clips allow for a great deal of wood movement. My only problem with using them is aesthetic: I just don’t think they belong on fine furniture. I prefer using the more elegant shopmade buttons on any but the most utilitarian projects.
For the figure-eight style, one part of the “8” is set flush into a hole drilled with a flat-bottomed bit in the top of the rail, with the center of the fastener just out from the rail. The other end is screwed to the top. This allows the clip to rotate through a small arc to accommodate wood movement. One advantage of using these connectors is that you can install them late in the construction process. They’re best suited to modest-sized tables because of their limited range of movement.
To view the entire article, please click the View PDF button below:
Fine Woodworking Recommended Products

Jorgensen 6 inch Bar Clamp Set, 4 Pack

Stanley Powerlock 16-ft. tape measure
Bessey K-Body Parallel-Jaw Clamp




Log in or create an account to post a comment.
Sign up Log in