Coffee Table in Mahogany
Elegant legs are tapered on the planer and shaped by hand.
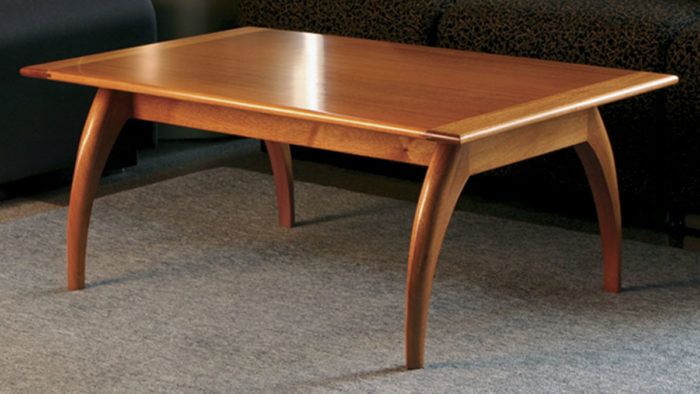
Synopsis: This mahogany coffee table is modeled after the modern solid-wood Scandinavian furniture of the 1950s. The thin top appears to hover above two muscular arching leg frames. At the bottom, the outside surface of each leg is shaped to create a sharp edge, much like a crease. As this crease extends higher on the leg, it gradually morphs into a smooth radius. The curved legs are shaped on the thickness planer and then sculpted by hand. Joinery is a combination of dovetails and mortises-and-tenons. Breadboard ends are joined to the top with a contrasting wood spline, and all four edges of the top are shaped to a 3/4-in. radius.
New York City’s Lower East Side is an area often credited with cutting-edge trends in fashion, food, and home décor. Visit any specialty furniture shop there and you’ll likely find some good examples of modern solid-wood Scandinavian furniture from the 1950s. Resurrected mostly from garages and attics, this is a style that appeals to a fast-paced crowd that likes furniture with bold, vigorous lines and a clean, uncluttered look.
This table incorporates much of what’s good about furniture from the post-World War II era. A thin top appears to hover above two muscular arching leg frames that look ready to stride across the room. At the bottom, the outside surface of each leg is shaped to create an edge at the center that looks much like a crease. As the crease extends higher on the leg, it gradually morphs into a smooth radius. It’s an interesting detail, and one that’s not easily lost on the eye.
Mill the material, then make the legs first
I used 8/4 stock for the legs and the leg rails of the table, and 4/4 stock for the stretchers, the top, and the breadboard ends. Mahogany is a good choice for this project. It’s readily available in long, wide boards, it works easily with both hand tools and machine tools, it sands smoothly, and it takes a finish well. Plus, the patina improves with age. Indeed, it has been just over a year since I finished the table and it already has acquired a deep, coppery color.
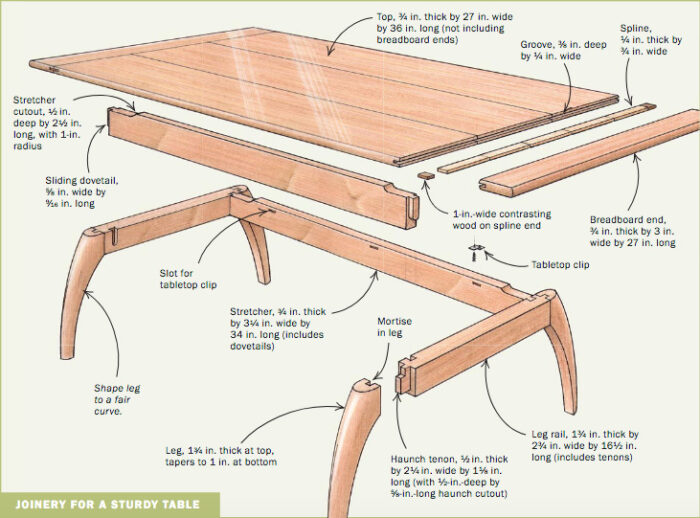
I milled the stock to its final thickness: 1 3/4 in. thick for the legs and the leg rails, and 3⁄4 in. thick for the stretchers, the top, and the breadboard ends. Then I cut the stretchers and the leg rails to width and length. Each leg starts at the floor as a slender, pointed foot. As it curves upward and disappears under the top, the edge of the leg flattens out to a smooth, robust curve.
Use a template to draw the legs—Begin work on the legs by making a template that matches the curve of the leg when viewed from the side. Rather than draw the entire outside arc of the leg on the template, leave a little extra wood in the form of a “horn” at the top of each leg. This horn will provide a parallel surface so that later, when it’s time to clamp the leg and the leg-rail assemblies, you can apply plenty of clamping pressure to ensure a tight joint. The horns will be cut off after the legs have been assembled to the top rails.
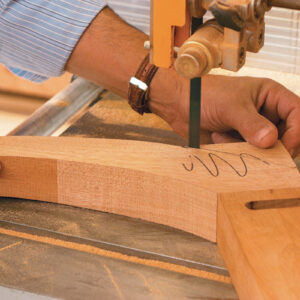
For each leg, you need stock that’s 13⁄4 in. thick by 6 in. wide by 16 in. long. At least one of the corners must be square. Place the template on the stock, taking care to align the top and the inside edges with a square corner on the stock. Trace the outline with a pencil, then cut it out on a bandsaw, staying just slightly on the waste side of the marked line.
I cut the leg mortises before the tenons. That way, if the mortises end up oversize or undersize, the tenons can be adjusted as needed for a snug fit. Lay out the mortises with a marking gauge, positioning them exactly on center. The mortises can be cut positioning them exactly on center. The mortises can be cut easily enough with a drill and chisel. But I’m fortunate to have a mortiser, so I immediately put it to good use. To make the mortises at the right angle, I rest the horns on a block on the mortiser table.
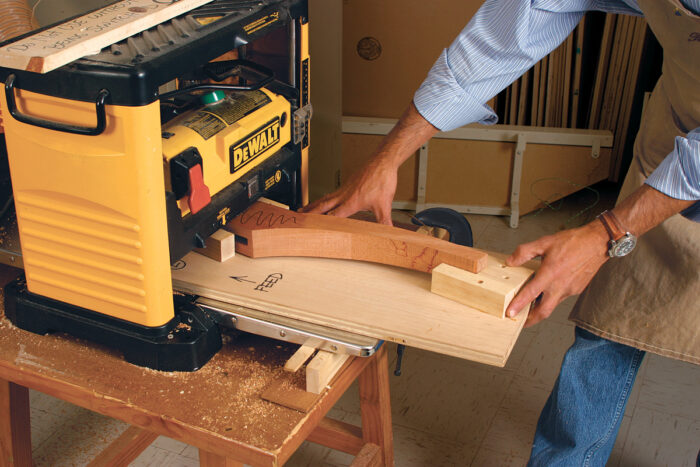
Taper the leg—The leg taper is next. Each taper starts at a point 3 in. below the top and extends to the bottom of the leg. At the starting point, the leg has the full 13⁄4 in. width; then it tapers 3⁄8in. on each side to produce a thickness of 1 in. at the bottom.
I use a thickness planer and a couple of simple jigs to create the tapers (see drawings, p. 69). Each jig is a rectangular base piece made of 3⁄4-in.-thick plywood. The leg blank is placed on the base, roughly perpendicular to the planer cutterhead. Then a few wood blocks are butted up to the blank to hold it in position as it travels through the planer. The first jig has a spacer that raises the end 3⁄8 in. above the base. The second jig, which is a mirror image of the first, has a spacer that raises the opposite face of the leg a total of 3⁄4 in.
If you’d rather not make the jigs or use a planer for the tapers, you can scribe the tapers along the edge of each leg and then use a bandsaw to trim away most of the waste. A couple of lengths of masking tape work just fine as straightedges that easily conform to the curve of the leg. After bandsawing, complete the taper by using a handplane to smooth the sides of each leg right up to the scribed lines.
Make the leg rails and assemble the legs
With the leg tapers completed, work on the two leg rails. Each one needs tenons on both ends and a pair of dovetail mortises on the inside face. A haunched tenon is a good choice. The haunch provides added glue surface without weakening the tops of the legs.
Use a marking gauge to lay out the tenon thickness. Then, with a tablesaw and miter gauge, make a cut along both sides and the bottom edge to create the shoulders. After that, use the tablesaw to make the first haunch cut. Following the layout lines, cut the cheeks a little fat on the bandsaw. Make two more cuts on the bandsaw, one to complete the haunch and one to trim the tenon to width. Finally, use a fine rasp or shoulder plane to thin the cheeks as needed for a perfect fit in the mating leg mortise.
The dovetail mortises for the leg rails are cut with a router and a 3⁄4-in., 7º router bit. I stop the dovetail mortises 1⁄2 in. short of the bottom edge of the rail. A pencil mark on the router table tells me when to stop.
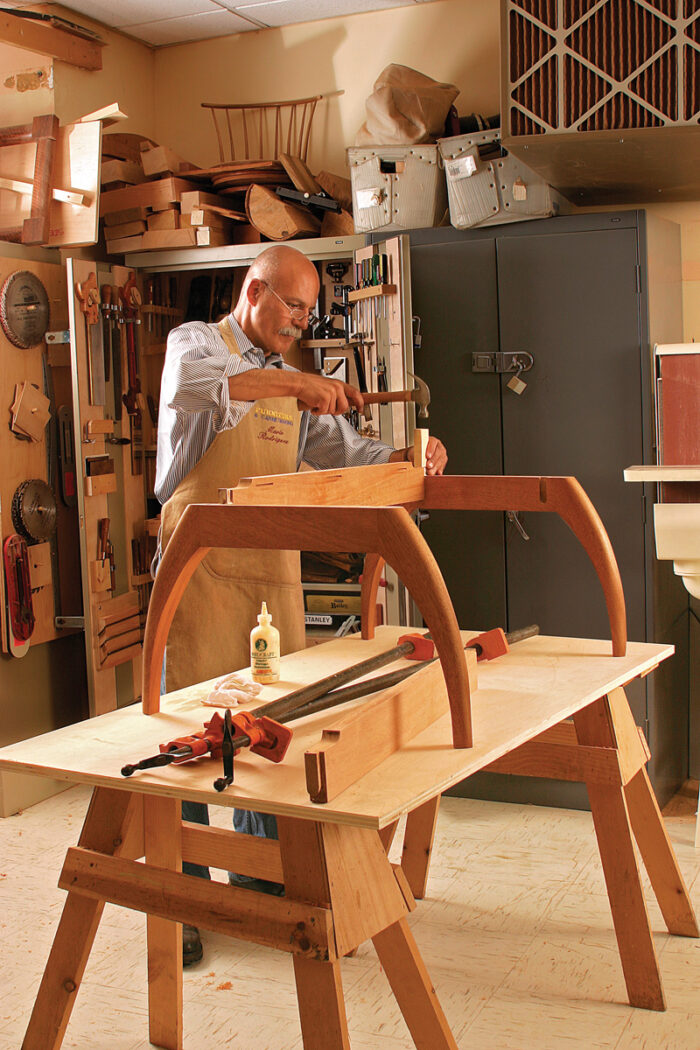
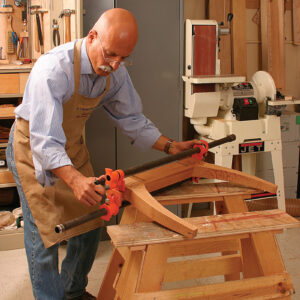
Each leg frame is made up of two legs and a leg rail. With the horns still attached to the legs, you should be able to glue up each frame with a couple of clamps. Before gluing, though, give the underside of the legs and the rails a thorough sanding. After gluing up, check the flatness of the frames with a straightedge. Clean up excess glue with a damp rag, then set the frames aside to dry.
Now finish shaping the legs
After removing the clamps, return to the bandsaw to cut away the horns. Now it’s time to finish sculpting the legs. There are two objectives at this point: The first is to shape the outline to a
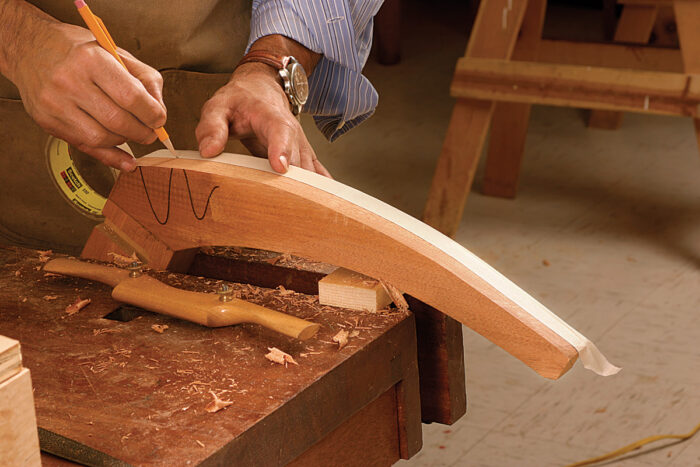
smooth arc with no blips, depressions, or flat spots. The second is to shape the changing profile of the leg.
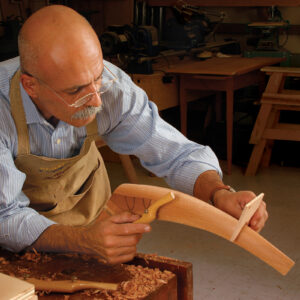
I use a spokeshave to shape the arc of the leg into a smooth curve. Adjust the spokeshave to produce thick curls for the heaviest cuts, then readjust the blade for fine, gossamer shavings as the curve becomes more refined. A microplane (one of those stain-less-steel cheese-grater-type cutters) can be helpful here. It can be easier to use in situations where the grain constantly changes.
With the arc of the curve generally smooth, I use a piece of tape as a flexible rule to mark a line down the center and establish the crease. For the crease to really stand out, cut away material just to the sides of it. Otherwise the curve will flatten out, appearing fat and making the crease look soft.
To gauge progress, it helps to make a series of section templates to fit against the work as you shape the legs. Work away from the scribed line and the “knee,” in the direction of the grain, always careful to leave a smooth surface with crisp corners. Once most of the material has been removed with a spokeshave, a wood rasp is perfect for adjusting the profile and shaping the razor-sharp crease in the front edge of the leg. The longer the rasp, the easier it will be to achieve a smooth curve.
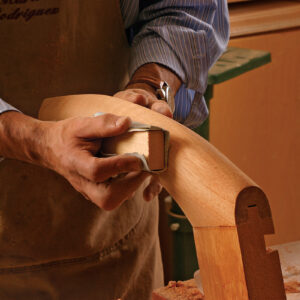
For the final shaping and smoothing, a flat card scraper is indispensable. I reground the edge of my scraper to a subtle concave curve to better blend the changing contours of the leg.
Finally, use 100-grit sandpaper to remove tool marks, finish off the crease, and complete the shaping of the legs. I find 100-grit coarse enough to remove material and make subtle changes in the shape, but not so coarse that it takes hours of remedial sanding to remove leftover scratches. During this stage, I often wet the leg with denatured alcohol to highlight any tearout, tool marks, or rough spots that need to be removed before progressing to a finer grit.
Make the stretchers
The two stretchers connect the leg frames, forming the base of the table. The stretchers also provide a means to attach the tabletop to the base.
I put my router table to use again, this time cutting the dovetails on the stretcher ends. There’s no need to do anything with the bit; it remains at the same height for this cut. This time, though, use an L-shaped fence clamped to the table to support the stretcher. A notch in the fence allows you to bury the bit. In addition, I use a secondary fence to prevent the piece from tipping from front to back. Make a few trial cuts until the fit is perfect.
Using a rasp, round over the bottom edge of the notch so that it fits at the end of the dovetail mortise in the leg rail.The top edge of each stretcher is cut away at the ends, producing the effect of a tabletop that floats above the leg frames. Begin by marking out the location of the cutout that creates the narrowed end. Cut it out on the bandsaw, staying just on the waste side of the line. Use a drum sander, then a scraper to smooth the sawn edge to the line.
After the leg frames have been sanded, apply glue to the stretch-er dovetails and the dovetail mortises on the leg rails. Then, assemble the stretchers and the leg frames, adding a couple of bar clamps to make sure everything stays in place until the glue has dried.
Using the router and a 1⁄8-in.-wide slot-cutting bit, cut four short grooves in each leg rail. Make them just long enough to accept small, metal tabletop clips on the inside surface of the rails.
Glue up the top and add the breadboard ends
After ripping the boards for the top to nearly equal width, and crosscutting each one a little on the long side, I join them with biscuits. Once dry, I use a crosscut sled to square the ends of the assembled top on the tablesaw.
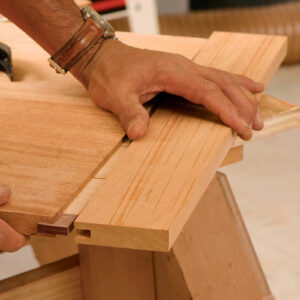
Breadboard ends give the table a clean look and help to keep the top flat. The easiest way to mount the breadboard ends is to use a router with a 1⁄4-in. slot-cutting bit and cut a groove on the inside edge of each breadboard and on the ends of the top. A solid-wood spline goes in the grooves. The top must be able to expand and contract with seasonal changes in humidity. To accommodate this movement, I glue the spline to the top along its entire width. On the breadboard end, I apply the glue at the midpoint for about 12 in. This is sufficient to keep the top flat and strong, yet allows it to move without cracking.
I use 1⁄4-in.-thick mahogany stock for the spline, but any hardwood will work. In order for the spline to move in unison with the top, the grain of the spline must run parallel to the grain of the top. The spline doesn’t need to be one piece from one side of the top to the other. Several narrower pieces, placed side by side, work just as effectively. To create visual contrast, I add a short piece of walnut at each end of the spline. This is an eye-catching detail, so a clean, tight job is a must.
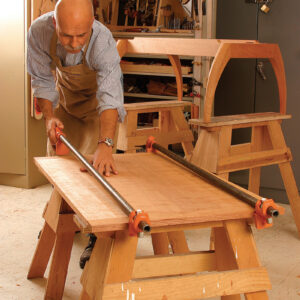
Once the top, the splines, and the breadboard ends are assembled, a couple of pipe clamps provide enough pressure on the joints.
Now, with the breadboard ends mounted, round over all the top edges using a 3⁄8-in. quarter-round bit on the router table. The result is a 3⁄4-in. radius around all four edges of the top.
Next, place the base in the center of the upside-down tabletop. Slip the table-mounting clips into the slots cut earlier. Secure each clip to the underside of the top with a screw.
Apply finish to the table
I chose Waterlox Original for the finish. It’s easy to apply and can be rejuvenated without fuss.
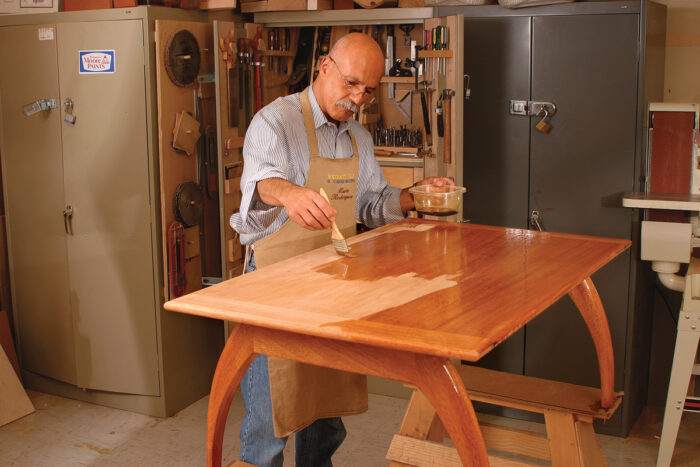
After sanding all surfaces with 220-grit paper, brush on two coats within a couple of hours and allow the table to dry for 24 hours. Then sand with 220-grit sandpaper. The result is a casual open-
pore surface that’s easy to maintain.
Adding more coats and wet sanding with Waterlox produces a smoother, high-gloss finish. Either approach gives great results.
The next step is to wipe on a light coat of Waterlox with a rag to brighten and even out the finish. As a final step, apply a coat of paste wax and buff all the surfaces to a soft luster.
From Fine Woodworking #182
For the full article, download the PDF below:
Fine Woodworking Recommended Products

Stanley Powerlock 16-ft. tape measure
Compass
Drafting Tools




Log in or create an account to post a comment.
Sign up Log in