Engineering a Table with Drawers
There's a simple, adaptable system hidden in almost every table.
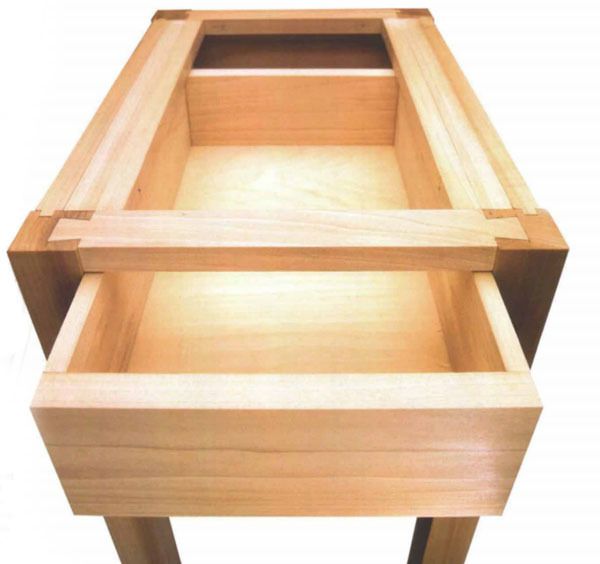
Synopsis: Will Neptune’s approach to building tables with drawers is extremely adaptable. Photos of a mock-up he built show the basic components: dividers, doublers, runners, and kickers. For efficient construction, he designs joints that share like dimensions and like locations relative to the leg. He explains how he joins the runners and kickers at the front and back of the table when the span gets long. He says a table with more than one drawer requires a partition tying together the dividers between drawers and a complement of internal runners, kickers, and drawer guides. The article includes detailed drawings of divider joints, a dovetailed wide upper divider and a tenoned wide lower divider, kickers and runners, and partition options for supporting spans.
I like to tell my woodworking students that there’s a Shaker nightstand hidden in every table with drawers. I may be overstating my case, but only by a bit. At the North Bennet Street School, we teach strategy. Our largely traditional approach to building tables with drawers isn’t the only approach, but it’s almost endlessly adaptable; once you understand it, you can apply it to Chippendale writing desks, Pembroke tables, contemporary tables, whatever you like. An approach is liberating: It leaves room for good design and good workmanship while eliminating the need for mock-ups, prototypes and reinventing the wheel.
There’s nothing new about this attitude. Thomas Chippendale’s Chippendale Director contains page after page of chairs and chair backs. No joints. No dimensions. Nothing about how to build a Chippendale chair. Chippendale assumes his readers already know how to build a chair and that chairs are all built the same way.
When our students build a table with drawers, they learn a system. I recall one student who started a veneered Pembroke table after having done a simpler table with a drawer. “Remember when you built the Shaker nightstand?” I said to him. “Now here’s what you’re gonna do different.” His eyes lit up and he said, “Ah, and you just make this longer, and curve that and, oh, yeah, yeah, yeah.” He already knew how to build a Pembroke table—he just didn’t realize it.
 |
 |
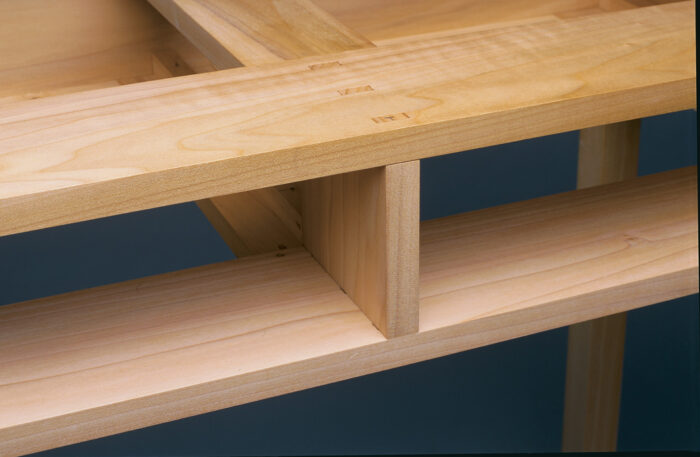
The single-drawer demonstration table I built reveals the basic components of a simple table with-drawer system: dividers, which replace the front rail to make room for the drawer; doublers, which fill out the side rails and serve as drawer guides; runners, which support the weight of the drawer; and kickers, which keep the drawer from tipping upward when pulled out. Some tables require ledgers to support the runners and kickers, and there are others that do without doublers. Nevertheless, if you took apart a Pembroke table, you’d find the basic components in one fashion or another. And you’d know the secret to building tables with drawers: Inside, they’re all about the same. Knowing this is like having a deck full of jokers. You can just keep playing the cards.
A strategy for construction as well as design
It’s worth taking a close look at the components that make up the table-with-drawer system, not only in terms of how each functions as part of an overall design but also in terms of how each is constructed in concert with the other components. Although there’s no reason why you couldn’t apply my strategy to building a table by hand, I’m going to assume you will use a tablesaw and a thickness planer. For me, efficiency demands the use of machines, even for the construction of traditional furniture forms.
The key to efficient construction lies in designing joints that share like dimensions and like locations relative to the leg. The tablesaw cuts related parts to equal length; the planer establishes consistent thicknesses and widths. Together, the tablesaw and thickness plan-er allow groups of parts to have compatible machine-cut joints.When you plane the dividers to thickness, you can also plane a number of square-dimensioned sticks for runners, kickers and ledgers. If you make the haunched tenons on the rails and the twin tenons on the lower divider the same length and location from the face of the leg, then you can cut all the mortises on a hollow-chisel mortiser with a single fence setting. And you can cut the main shoulders of these joints, as well as the dovetails on the upper divider, without changing the dado height or the fence setting.
Once you’ve milled the pieces, you’re ready to put together the essential table: four legs, three rails and two dividers. The upper divider is dovetailed into the leg; the lower divider can’t be dove-tailed, so it’s twin tenoned (see the drawing above). With the table glued up, you can take your time installing the inner pieces—doublers, kickers, runners and (if need be) ledgers.
 |
 |
 |
The first pieces to go inside I call doublers because, roughlys peaking, they double the thickness of rails. More important, the doublers bring the rail assembly flush to the inside face of the leg,so you don’t have to notch the runners and kickers. Some people would call the doublers side guides, and that’s what they are as faras the drawer is concerned: blocks that keep the drawer from shifting from side to side as it’s pulled out. Cut four doublers to length,and glue them to the top and bottom of the side rails. That’s that.
Onto the surface of each doubler, glue one of the little square sticks you thickness planed at the same time as the dividers, one stick at the top of each upper doubler to serve as a kicker, one stick at the bottom of each lower doubler to serve as a runner. Taken together, a doubler and runner or a doubler and kicker form an L-shaped piece of wood, which you could make by rabbeting one piece. But they’re much easier to make and install inside the table as two pieces. The wide face of the doublers remains stable when glued flush against the rail. The kickers and runners are such small squares that they won’t curl or twist.
What to do when the span gets long
On a small table like my single-drawer demonstration table, gluing the runners and kickers to the doublers, letting them butt against the dividers and the rear rail (or a cleat for securing the tabletop), provides enough strength to support the drawer. On a larger or heftier table or on a table with multiple drawers, you may need to join the runners and kickers at the front and back of the table.
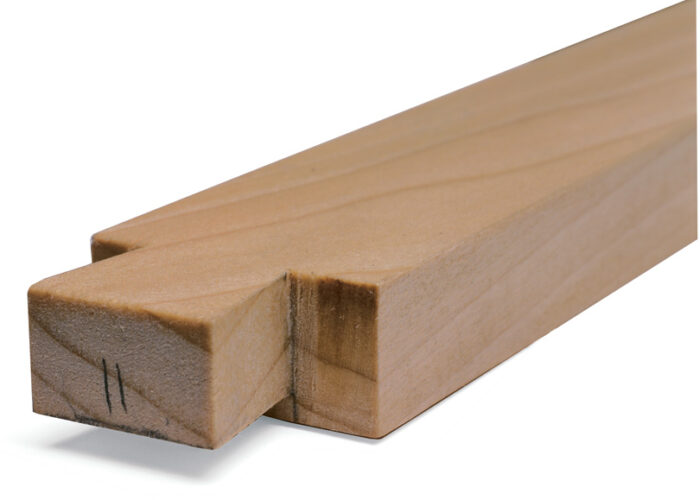
At the front, you can tenon the runners to the lower divider and the kickers to the upper divider. You may not want to tenon the runners and kickers at the back of the table, however, because you’d have to glue up all the pieces at once. Imagine doing that on a five-drawer lowboy with offset drawers!
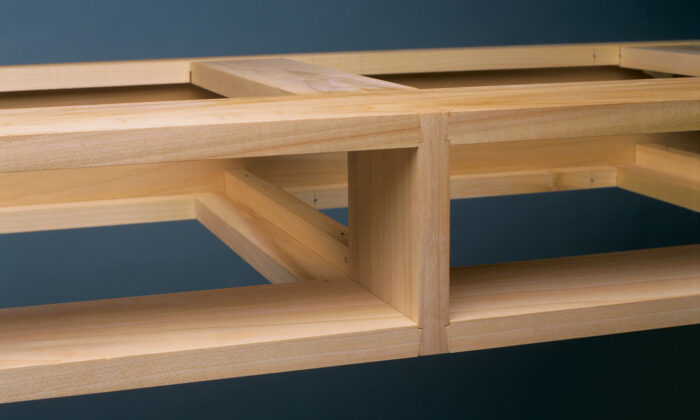
To avoid having to glue up all those sticks at once, dado two small sticks (which you have milled and ready) across their width to accept a half-lap joint from each runner and kicker, and then brad the sticks temporarily to the rear rail as ledger strips . To allow you to install the kickers and runners after the table frame is glued up, cut them a touch short. Cut the tenons relatively short as well. Even a -in. tenon will take the weight of a drawer. Just slide in the tenons, and snap the pieces into place. Then slide in the ledgers, using the brads to locate them for gluing.
If the span of the table is long and you need the dividers to be stronger, there are only two things you can do: Make the dividers wider, or make them thicker. Making them thicker is, by far, the easiest route to take because a little thickness adds a lot of strength.But many designs simply won’t allow for a thick divider.
If you settle on making wide dividers, however, you’d better make them really wide. An extra in. of width isn’t going to in-crease the stiffness of the divider to speak of, and an undersized divider will deflect downward. I’d make the divider 4 in. wide at least; a 4-in. divider is no more work than a narrower one. The trouble is, a wide divider stands a good chance of cupping or twisting. To resist racking, you have to join a wide divider not only to the legs but also to either the doublers or the side rails.
When you join a divider to a side rail or doubler, however, you run the risk that the movement of the rail as it expands and con-tracts will work the divider like a lever. To prevent movement in the rails from cracking the dividers, keep the rails relatively narrow(ideally less than 4 in. wide), and make the dividers really wide so that movement at the inner dovetail is spread out over a greater distance before it reaches the front dovetail.
Joining the dividers directly to the side rails is historically accurate, but it’s tricky because you have to mill dividers longer than the rear rail and then notch the dividers around the leg. The other way to join wide dividers—attaching them to the doublers—is awfully tempting. A big advantage to attaching wide dividers to the doublers rather than to the rails is that you can make both dividers the same length as the rear rail. The dovetails are easy to cut because they share a shoulder,and all these shoulders can be cut with the same dado setup used for the rail tenons. The forward dovetail is joined to the leg exactly as it would be on a narrow divider. The inner dove-tail can be either a full dovetail, as it is in my demonstration table,or a half-dovetail. In either case, leave as much space as possible between the inner dovetail and the end of the doubler. If the housing for the dovetail is close to the end of the doubler, the little short-grained piece that remains can easily crack off.
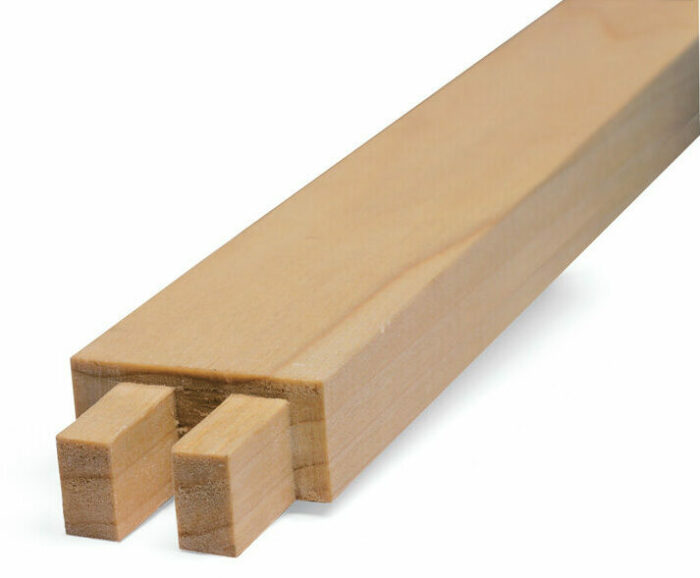
Joining the lower divider to the lower doubler is a little trickier.The lower divider, you remember, is twin tenoned into the leg, so you don’t want to dovetail it to the lower doubler because then assembly would be difficult. Instead, join the lower divider to the lower doubler with a horizontal tenon, cut to the same length as the twin tenons. This inner tenon must be as thick as possible for strength, with little or no shoulder on top, so there is enough wood in the doubler below the mortise to provide adequate strength; the doubler will still have plenty of wood above the mortise.
Whether you make the dividers wider or thicker, sizing them is a judgment call. Err on the side of over-built. If the table bounces,what are you going to do about it? If it’s a bit sturdier than it needs to be, you’ll never know, and you’ll be none the worse for it.
How to handle more than one drawer
A table with multiple drawers requires a partition tying together the dividers between each drawer and a complement of internal runners, kickers and drawer guides. It makes sense to mill the partitions at the same time as the dividers; just be sure to leave the divider blanks long, and whack the ends off. There are your partitions, already at the proper width.
If you feel comfortable with the span of the dividers and you simply want two drawers for looks or functionality, then you can stop dado a non-structural partition into the dividers from be-hind. But if the dividers are really long—for example, 3 ft. or4 ft.—the stopped-dadoed partition may pop out when the table deflects downward.
The easiest way to strengthen the joint between the partition and the divider is to use the same twin-tenon arrangement used to join the lower divider to the legs. On my multi-drawer demonstration table, the dividers are so wide, I used triple tenons (see the photo and drawing at left), but the idea is the same. I usually run the tenons through the dividers and sometimes even wedge them. If you join a pair of 3-ft. dividers together with two partitions and join the whole assembly to the legs, then you’ve created a girder. It’s amazing how stiff this system is.
So now that you have partitions between the dividers, how do you support the drawers in the middle of the table? You mill runners and kickers wide enough to support drawers on both sides of the partitions, tenon them to the dividers and half-lap them to the ledger on the rear rail.
Treat these inner runners and kickers as you would the runners and kickers next to the doublers, with one big exception. You have to notch the middle of the tenons so they don’t interfere with the vertical twin tenons of the partition. To keep the drawers from swimming around, take another square stick, and glue it onto the center of the runner, long grain to long grain, to serve as a drawer-side guide. Problem solved.
You could also dovetail the partition to the dividers. A dovetailed housing cut across the full width of the dividers would compromise the dividers, so use a stopped dovetail in the front to tie the dividers together, plus a shallow -in. dado across the width of the dividers to keep the partition from twisting.
Dovetailed partitions are easier to install than tenoned partitions because with dovetailed partitions, you can attach both dividers to the legs and then simply slip the partitions into place. The shallow dado allows you to slip the partition into the dividers and then scribe the tail onto the dividers before cutting its housing. It’s possible to cut the dado narrower than the dovetail to hide it from the front, but now I’m getting into variations on variations.
The beauty of this approach to engineering a table with drawers is that it doesn’t rely on the proportions or the style of the table.You can cut big legs or little legs; you can set the rails flush to the legs or inset them; you can turn the legs or taper them; you can make the table long and low and turn it into a coffee table or tall and long and call it a writing desk.What I hope I’ve constructed here is a conceptual frame work onto which you can overlay your own design ideas.
From Fine Woodworking #130
For the full article, download the PDF below:
Fine Woodworking Recommended Products

Stanley Powerlock 16-ft. tape measure

Starrett 12-in. combination square


Log in or create an account to post a comment.
Sign up Log in