Designing a Writing Desk
The inspiration behind a successful desk design.

I designed and built this desk in a hurry—a show I’d been invited to join was two weeks away. As it turned out, that wasn’t a bad thing, because it forced me to focus and to make design decisions quickly.
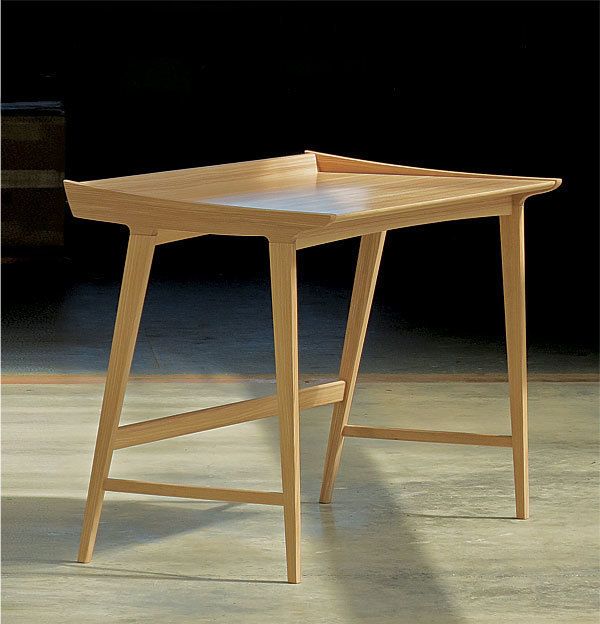
Much of the inspiration for the desk came out of danish Modern furniture. In particular, I was looking at desks with a broad writing surface and A-frame leg assemblies. I veered away from the standard danish Modern style by building my piece from a much lighter-colored wood, ash, and by making the shapes harder-edged.
As I designed the desk, I focused solely on the end view. I never even did a drawing of the whole desk. The piece was fairly simple, and I felt confident that if I got the ends right, the whole desk would hang together.
In a series of very rough end-view sketches, I explored various shapes for the desk’s end cap, settling on one that reminded me of the swooping hull of a racing sailboat. I also worked out the splay of the legs, giving the back leg a more pronounced angle than the front, and setting it farther in from the end of the end cap. when I had shapes I felt good about, I made a more careful—but still rudimentary—small sketch.
Then I made a full-scale end-view drawing on brown kraft paper (not quite artist’s vellum, but hard to beat at $11 per 140-ft. roll at Home depot). This full-scale drawing is where I worked out the sizes of the parts and the details of the joinery. At the tops of the legs, where strength was vital, I used shouldered tenons to join them to the end cap. But down below, to make the joinery less fiddly, I fully housed the stretchers into the legs; that way, with no shoulders to worry about, even if the angle of the legs was slightly off, the fit of the stretcher would be fine.
I followed up the full-scale drawing by making a full-scale poplar mockup of one end assembly. This allowed me to refine the shaping of the parts and do a trial run on the joinery.
To give the spare desk some real rigidity, I made the writing surface of plywood—veneered with ash I sliced from solid wood—and glued it to the end caps along its full width with tongue-and-groove joints. I also glued the surface to the rails beneath it.
with wood cut from the same plank as the veneer, I made a 3-in.-wide solid nosing for the front edge of the writing surface. This enabled me to undercut the front edge and bring it to a fairly narrow point, giving the impression of a thinner surface.
on some of the danish Modern desks I’d admired, there was a small drawer or two perched on the back of the writing surface. I liked that, and had planned all along to add one to my desk. But as the days flew by and the deadline loomed, I had to drop the idea. In retrospect, I’m glad; it seems to me it was another example of how the tight time constraints helped simplify and clarify my vision of the desk.
Fine Woodworking Recommended Products

Sketchup Class

Drafting Tools

Compass


Comments
Thank you so much for this. I love the shape, curves and simplicity. Thank you for the article. I will incorporate the idea of a full size plan on kraft paper and then building a full size mock-up to get the joinery right. Those two steps alone would save me double the time of the entire project.
Log in or create an account to post a comment.
Sign up Log in