The Rule Joint Done Right
Attractive drop-leaf joint revolves around precise layout and matching router bits.

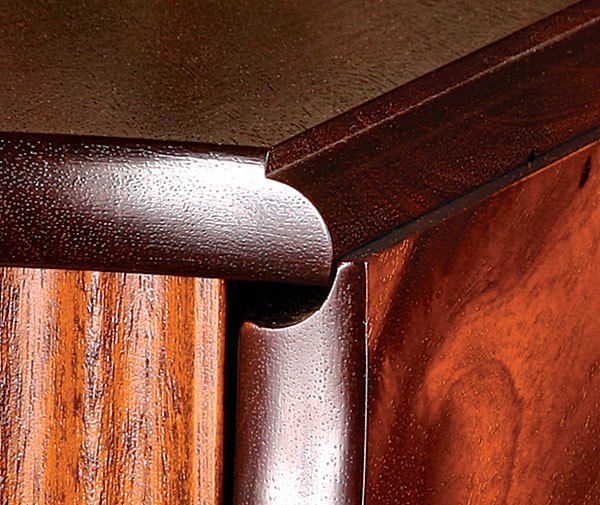
Synopsis: Most common on drop-leaf tables, the rule joint looks good open or closed, and it keeps the hinges hidden. When the table leaves are down and the joint is exposed, it shows a thumbnail profile. When the leaves are up, the joint disappears. It’s not difficult to lay out and cut a rule joint accurately, but you need to understand the mechanics. Michael Zuba’s method uses two common router bits and divides construction into three distinct steps: Cut the bead, cut the matching cove, and install the hinges.
From Fine Woodworking #200
Note: The PDF was updated 8/7/2008 to fix an error. The half-round or bull nose bit was mislabeled as a 3/4-in. radius instead of a 3/8-in. radius.
Most commonly found on dropleaf tables, the rule joint allows the outside leaves to be lifted to create a large, useful surface, or folded down to save space. The beauty of this molded joint is that it looks attractive whether open or closed, and it keeps the hinges hidden.
You need to understand the mechanics of this joint in order to lay it out and cut it accurately, and project articles rarely go into enough detail. A rule joint consists of a board with a bead (typically the fixed top of a table) and a board with a cove, or cope (typically the movable leaf). When the joint is closed, the two boards meet tightly and on an even plane. As the leaf is lowered, the cove rolls evenly around the bead. Two or more hinges support the leaf. The secret is to place the center of the hinge barrel in line with the center of the bead.
Although you can create this joint with matching molding planes or shaper knives, the method I’ll explain uses two widely available router bits. And construction is easy when divided into three main steps: Cut the bead, cut the matching cove, and finally, install the hinges.
Dial in the setup on a sample board: It is vital to the smooth operation of the rule joint that the boards remain flat and true, so rough-mill the boards a little oversize and allow them to rest in your shop for a week or so to make sure they are stable and don’t cup or twist. Then mill them to final thickness, in this case 3⁄4 in. I always mill a sample board to the same thickness as the tabletop and use it for layout and test cuts all the way through the process to ensure the rule joint fits properly. This makes me confident that everything will work when I start cutting my valuable tabletop.
The rule joint revolves around the barrel of the hinge, so start laying out the joint by setting a marking gauge to the distance from the flat side of a drop-leaf hinge to the center of its barrel (see “The right hinge for a rule joint,” p. 72). The grain of the tabletop and the drop leaf runs parallel to the rule joint, so the layout is done on the end grain. Scribe a line along the end grain of the sample board, registering off the bottom edge of the board. Make sure you lay out the end of the board that will contact the router bit first on the router table.
I used a 3⁄8-in. radius halfround or bullnose bit to cut the bead, so I set a compass to this distance. Put one point of the compass on the scribe line and the other where this line reaches the edge of the board. Now draw an arc of about 180º whose apex just touches the edge of the board.
For the full article, download the PDF below:
Fine Woodworking Recommended Products

Starrett 4" Double Square

Leigh D4R Pro

Suizan Japanese Pull Saw


Log in or create an account to post a comment.
Sign up Log in