Tilt-Top Table
Clean lines and a clever pivot highlight this attractive and useful table.

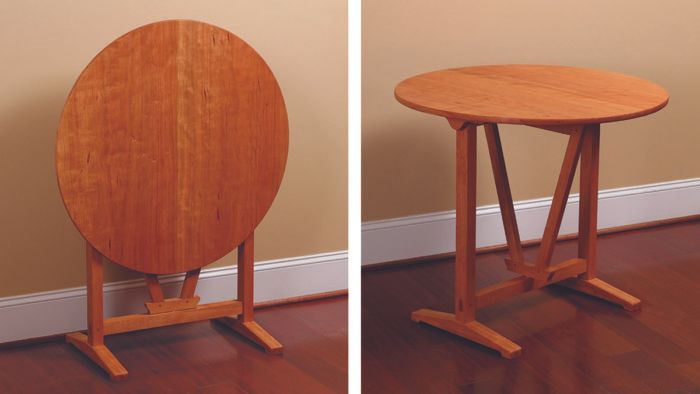
Synopsis: This table has a round top that pivots on two pins so it can be brought vertical and stored against a wall. Commonly known as a wine-tasting table, this design was inspired by a piece from the late 1700s, but Will Myers gave it some modern touches—a larger top, a more modern shape to the feet—and used cherry instead of the traditional pine. Construction is not difficult, and the entire project can be made using hand tools if you desire.
I found the inspiration for this table inside one of the handsome brick buildings of Tryon Palace in New Bern, N.C. Built as the residence and headquarters of North Carolina’s British governor in 1770, Tryon Palace was seized by American forces in 1775 and served as the state capitol until 1794. Destroyed by fire in 1798, the palace was rebuilt to the original plans in the 1950s, and fitted with furniture appropriate to the period. The table that caught my eye was in the palace’s kitchen building.
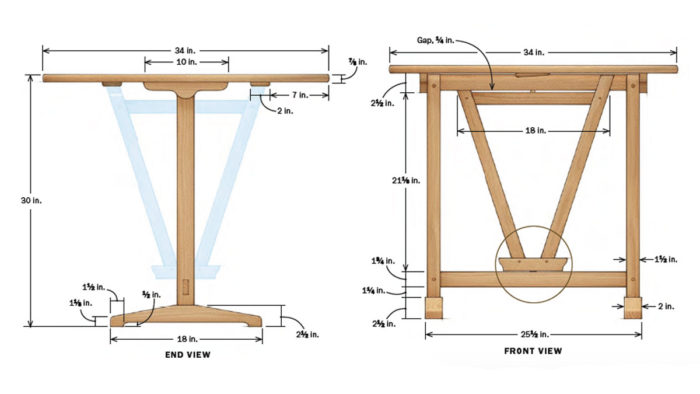
Commonly called a wine-tasting table, it has a round top that pivots on two pins so that it can be brought vertical and stored against a wall. There is a swing arm that looks like an inverted A in the frame that spins out to support the top when it’s swung down for use, and rotates back flush with the frame when the top is up for storage.
The table I’ll show you how to make here is slightly different from the one at Tryon Palace. It has a larger top, and I’ve given the feet a modern shape. Also, the original was made from pine, perhaps chosen because its light weight would make it easier to move around. I’ve opted for cherry instead. This table isn’t very large, and cherry isn’t terribly heavy, so the extra weight won’t be an issue.
This isn’t a difficult table to make, and it’s a great project for hand tools. I cut all the joinery by hand, and after milling, it took just a couple of days to make the table. It’s a handy table to have in the house. It doesn’t take up much floor space when not in use, and it is ready to seat four in a quick minute when company shows up.
Make the base frame
Beneath the table’s round top is a rectangular frame that consists of two legs and two stretchers. You can make the feet at the same time that you make the frame, but don’t attach them until right before you add the top. They’ll just be in the way as you make and install the swing arm.
Because I cut all of the joinery with hand tools, I carefully lay out joint locations with paired parts, such as the legs, clamped together. After laying out all of the joinery, I chop the mortises with a chisel and mallet. I use the same technique for the slot of the bridle joint at the top of the leg. However, the through-mortises in the feet are better done by first drilling out the waste with a brace and bit, and then squaring them with a chisel.
Cut the tenons next. After they’re done, dry-fit the legs and stretchers. The top stretcher must be rounded over so that the top can pivot, so assemble the frame, clamp it in your bench vise, and lay out the half circle with a compass. Pull the frame apart and rough out the roundover. On the top of the legs, I use a chisel and mallet to remove most of the waste, and then refine the curve by paring to the layout lines. For the top stretcher, I use a jack plane to round the top edge roughly at this point.
Now glue the frame together. After the glue has dried, clamp the frame in your bench vise and refine the roundover on the top stretcher. It doesn’t need to be perfect to work well, but I get the facets as small as I can, and then run some sandpaper over the surface to remove them.
Will Myers makes furniture in Hamptonville, N.C., and teaches hand-tool woodworking at The Woodwright’s School in Pittsboro, N.C.
More on FineWoodworking.com:
- Mario Rodriguez Tilt Top Table #173
- A table for 2, 4, or 6, Chris Gochnour, #255
- Arts and Crafts Side Table, Dunton, #186
Download the plans for this table from the Digital Plans Library. Plus, browse 100+ other plans available for members only.
To view the entire article, please click the View PDF button below.
From Fine Woodworking #273


Comments
If the plans are free why is there a link to the store where you have to pay $12.95 to get them?
Those are the full-size printed plans.
Where are the free plans?
Look at the whole page Mustache. If you're already a member just log in and the PDF button will magically appear! Look for this:
Get FREE Access
to this project when you enter your email address below.
Plus, get Fine Woodworking emails filled with plans, how-to, and special offers.
Sign Up or Log In
Although the table is quite interesting, I can't take my eyes of Will's bench on page 61. Any chance Will would let us see more of that beauty?
thanks-
Agree, the title clearly says 'free plan', but they are not free!
Page three of the PDF shows you everything you would need to build the table.
I have a rookie question. On the drawing, pg 62, he indicates length dimensions. For example, the legs are 28 1/2”. Does that length include the tenon length? A little math indicated it does, but wanted to be sure before I cut this expensive wood!
Yes. That measurement is with the tenon. Sometimes, when appropriate we will use shoulder-to-shoulder measurements, but those will be labeled.
Cool, wish you could rotate the legs too so they don't stick out.
That's be a fairly simple modification to the plans if you wanted to do it.
Log in or create an account to post a comment.
Sign up Log in