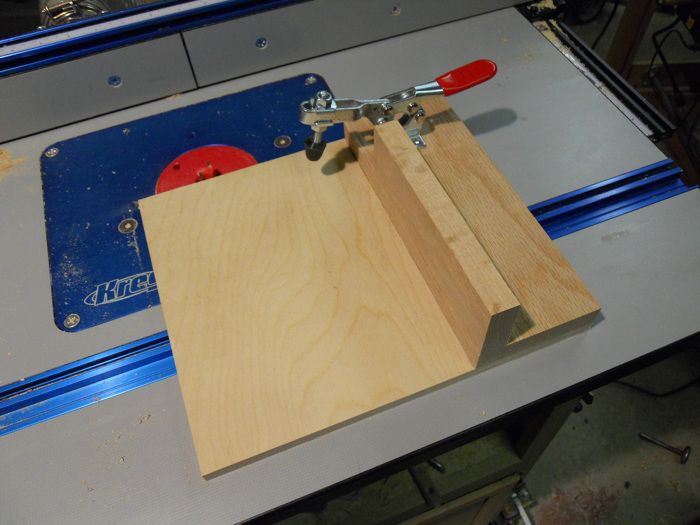
Router table tenoning sled

Tenon Sled
I have always had less than stellar results using a miter gauge to make tenons, either the stock slipped, or I never quite got lined up correctly to my cut line.
My solution was to make a zero clearance sled that runs in the miter gauge slot. First, i cut a runner 3/4″ wide by 1/2″ thick from some scrap poplar. With my planned bit in the router (in this case, a 3/4″ Freud mortising bit #DR16104), I locked the router table fence about 1/8″wider that the bit side of the miter slot to bit distance and ran a 1/8″ deep groove across a 10″x12″ piece of 1/2″ birch ply. I then glued the runner into the groove.
After the glue dried, I raised the router bit (in stages) and pushed the sled past the bit using the miter gauge slot. This formed a perfect zero clearance table. Next, I took a scrap piece of 3/4″ red oak and carefully glued it exactly 90 degrees to the newly machined surface of the sled to form a fixed backstop. I took another piece of 3/4″ red oak and attached it on edge to the backstop using pocket screws. This piece allows me to use a clamp when milling the “tall” end of the tenon. Lastly, an adjustable clamp was added to hold the work solidly to the sled.
Use is simple. I first mark all 4 sides of the workpiece, adjust my bit height, then work up to my mark against the edge of the zero clearance sled.


Comments
Very nice. I just got a router table, and have been thinking of making a similar sled, but have seen that some people use the miter gauge slot as you did, and some people prefer for the sled to ride along the fence.
Have you tried both? I'd appreciate your thoughts.
I have a sled that rides along the fence to cope rails of frame and panel doors. It would be very limiting to cut tenons with a sled along the fence, which is why I use the miter slot.
Log in or create an account to post a comment.
Sign up Log in