The Art of Repurposing Wood Scraps
Source: Garden Buildings Direct
People who spend most of their free time in their workshops have one thing in common: they have pile upon pile of wood scraps that are left unutilised.
Either that or they share an unmatched supply of happiness from having created a visual art piece that’s also equally functional.
If you spend a great deal of time in your workshop transforming big chunks of hardwood into amazing pieces of art such as simple furniture and home essentials, you would realize that you have already accumulated a ginormous amount of wood scraps that’s worth another piece of a fantastic-looking furniture.
Keep those magical pieces around. With a little creativity and resourcefulness, you can recycle them into awesome wood projects. You would surely want to keep your wood scraps if you’re planning to repurpose your doors, furniture sets, and whatnot. Way to resolve your problem, eh?
1.Wood Vases
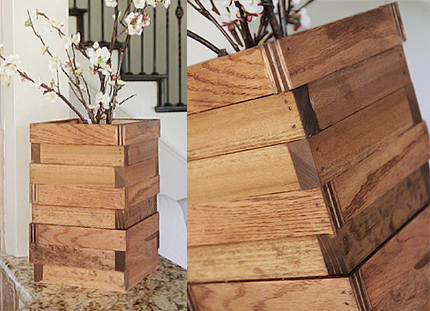
Real or fake flowers? It doesn’t matter. This vase made from wood scraps is one good reason why you should stop stressing over piled up wood fragments.
What you need:
32 rectangular wood planks (approx. 7 inches long) Wooden square base Wood glue Nails Wood paint Sand paper Mason jar
To make:
1. If you are using old wood planks, you have the option to sand them to smoothen them out or retain their rustic look for a unique appeal.
2. Using wood glue and nails, put together 4 pieces of wood planks to form a square box.
3. Once you have 8 square boxes, assemble the vase by stacking up the boxes. You may use wood glue or nails to put the pieces together.
4. Attach the wooden base. Make sure that the square base has the same size as the square boxes.
5. Apply wood paint. Set out to dry.
6. Put the flowers into a mason jar with water and put it into the wooden vase.
2.Doormats
Quite clever, eh? With a few pieces of wooden planks, you can already get yourself a trusty and unique doormat. Easy work, buddy!
What you need:
15 pieces wood planks (approx. 20 inches long) Sisal rope or any kinds of rope Drill
To make:
1. Ensure that the wooden planks have the same sizes. Drill four evenly-spaced holes into each side of the planks. Make sure that each side is properly drilled to form holes though the planks.
2. String the ropes though the holes to put the pieces together. Secure the ends by making basic overhand knots in between the planks and at the ends.
3.Chalkboard house blocks
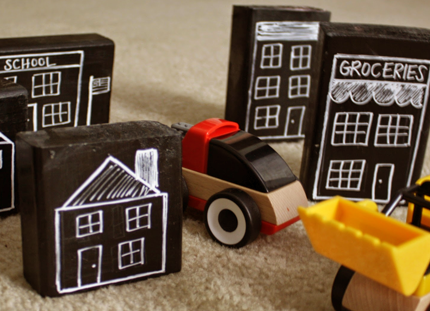
Your kids will surely love this DIY project. Who would’ve thought that scrappy wood blocks can pass off as your children’s favourite toys?
What you need:
Wood scraps (any shapes will do) Chalkboard paint Chalk Sandpaper Paint brush
To make:
1. Sand the wood scraps to smoothen them out.
2. Apply the chalkboard paint onto one side of the wood planks.
3. Once the paint has dried, start drawing house patterns onto the blocks.
4. Position the blocks in a sturdy surface forming a pretend neighbourhood.
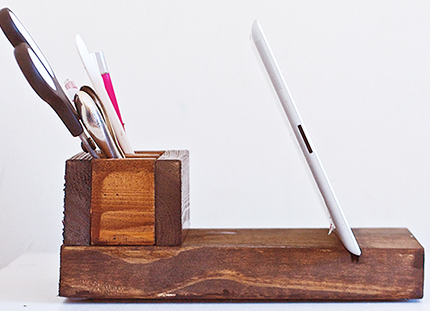
4. Office Supply Organizer
You surely wouldn’t want to spend your time in the office poring over how you would organize your messy workstation. Lost ballpoint pens, scissors, or notepads make for a stressful office drudgery. But fret no more! With this stylish and functional organizer made from wood scraps, getting your stuff organized becomes no chore!
What you need:
4 wood blocks cut into squares (approx. 4 inches tall, 3 inches wide) Sand paper Wood glue Nails Spray paint Sticky felt pads
To Make:
1. Begin by sanding the wood blocks.
2. Put together the pieces using wood glue and nails forming an open box.
3. Spray paint onto the box and set it out to dry. You may then start putting all your office supplies such as pens, scissors, pins, rubber bands, and notepads.
4. To protect your office table from getting scratched, you may add sticky felt pads under the organizer.
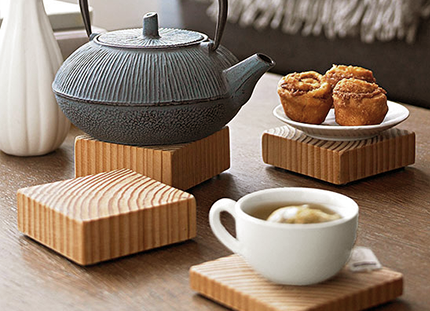
5.Beverage Coasters
Make your own simple drink coasters using old blocks of wood. Simple work!
What you need:
Old wood blocks (approx. 4×4 inches) Sand paper Wood Varnish Sticky felt pads
To make:
1. Sand the wood blocks to remove any unsightly marks and scratches. 2. Apply wood varnish. Let them dry. 3. Attach sticky felt pads at the bottom part of the wood block. This will prevent your table from getting scratched.
You definitely would want to keep wood scraps as you can transform them into practically anything. It wouldn’t take up much of your time putting pieces of wood scraps together and making a whole new functional piece that’s worth all the sweat. And by sweat we mean no sweat!




Comments
Imaginative and practical.
Good stuff!
Hello...I've been using free oak wood from pallets to make some really cool projects and selling them for some extra income. I've got thousands of woodworking plans to build. Here's where I got all my wordworking plans http://tinyurl.com/ntgfwjb
Log in or create an account to post a comment.
Sign up Log in