Happy Wife, Happy Life!

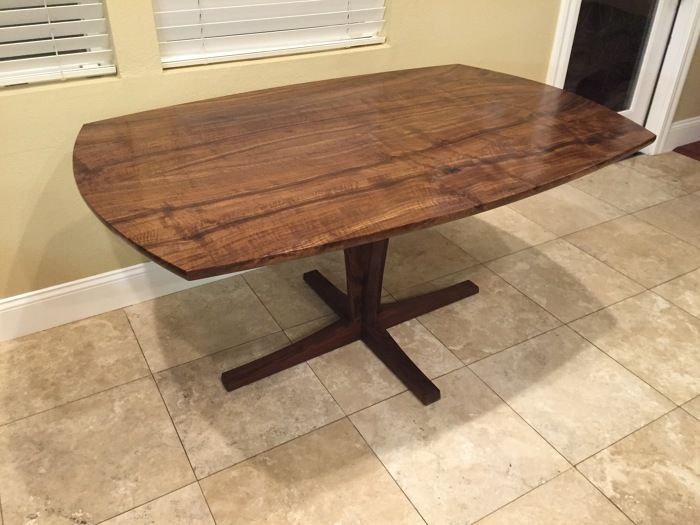
Tim Rousseau's Pedestal Table in California Claro Walnut!
The FW video series made this table a possibility for me. Much of the joinery was a “first attempt”, so it was a bit challenging to get the tollerances just right. Took my time, the result was fantastic.


Comments
I agree with you -- the results are fantastic.
Very nice job!
Looks great!
Really nice job. Those video series are great for encouraging people to take a leap and try such a project. It turned out great. An heirloom you'll have for many years if not generations.
You did a beautiful job, great looking wood. Hopefully that is my next project. Would you say it is a stable design, as far as the pedestal goes (versus 4 legs)?
Gorgeous top and workmanship, especially the complex center column; but I'm afraid I agree with Mr Miter: personally I doubt that the base is large enough--or therefore the table stable enough--if anyone puts a substantial weight on a corner. Specifically, if I see the picture right, the corners overhang the diagonals between the ends of the feet by well over 50%. Reasonably easy to fix, though, if you still have the matching stock, and of course if you're interested... (I regret to say 'm pretty expert on fixes, since I make mistakes all too often!)
For myself, I would cut the feet pieces on a vertical 60-70 deg diagonal about halfway out, and cut matching insert pieces of stock on the same angle. Maybe 5-6" extension on each, and a little over-width and -thickness. Then glue those inserts in on a sort-of slip miter, well clamped, with the small overlap for planing. Plugged screws would strengthen it and the whole extension would be just about invisible after planing and sanding.
If you prefer not, that's fine: just tell your party guests not to sit on the corners!
Log in or create an account to post a comment.
Sign up Log in