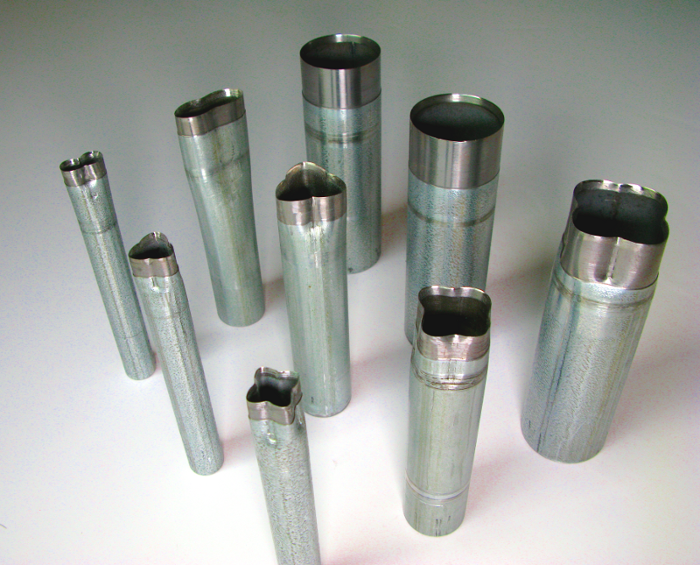
Set of Veneer Patch Punches

I have always wanted a “Cloud Punch” (to cut out a defect in a sheet of veneer and cut a matching patch). One commercial veneer patch punch costs about $120.00 U.S. plus taxes and shipping. (And that is for a small one) I have read about people making punches out of electrical conduit but had also noted that most have little success in doing so. I wanted to see if it was possible to use conduit as had been suggested or if some other method was required.
I picked up some EMT conduit and started thinking of how to put an edge on a tube. If this was going to be successful I would need a true “Zero Edge” on my punches. After a few days thinking about this I realized that there were serious issues working the edge with just a file and some sandpaper. I looked closely at the conduit and the first thing that hit me was that it was not round. Close but not perfect. The second problem I encountered was that the surface was rough.
If we could take a plane blade and bend it into a circle that would be a good start. We could then bend the already sharpened blade to the shape we wanted. (We want an organic shape that can blend in with wild burl veneer). So that is where I chose to start. I had to make the surface of the tube as smooth as the bottom of a plane blade and would put a primary bevel and micro bevel on the inside of the tube. This is where this build leaves the woodshop and moves to the metal shop.
I cut the conduit into six inch sections and chucked one in the lathe supported by a fixed steady. I first took a skimming cut off the outside to get a level surface. I then bored the inside edge at 12.5 degrees until I had about .010 of a flat edge remaining. Then to achieve a well supported edge I cut a forty five degree bevel of only a few thousandths of an inch. I now had the basic shape I wanted and began filing the outside diameter until the edge was close to gone but not quite. Following this I filed the inside edge with a small half round file to get rid of the machining marks.
Now on to 300 grit emery paper followed by 600 and then some super fine mylar film. Finally I chucked a small buffing point in a Dremel tool and buffed the edge. The result? A good, strong, sharp edge. Now to bend them to shape.
As I looked at my lathe a thought occurred to me! I could just close the chuck jaws on the nose of the punch and get a nice shape. I used both the three jaw and the four jaw to make the different shapes. Since I had thinned the outer wall and the metal is quite soft, I had little problem in getting the material to bend without hurting the chuck. With one puch now done I decided to make a set of nine – three each in 1/2″, 1″ and 1 1/2″ diameter.
I have not decided what shape to make two of the large punches so they have been left round for now. While the punches will work on regular commercial veneer without conditioning the punches are designed for use on conditioned veneer only. The edges will not hold up to working on dry unconditioned veneer. All of the puches were tested and cut with just a light tap of a heavy mallet on a hard rubber mat. Success!! Well sort of… If I were to do this again, I would use good steel tubing or solid bar and just bore the hole and shape the bevels on the lathe.
So to answer the question of if it is possible to just use a file or freehand grind the interior bevel, I would have to say that it is unlikely you will achieve the same result I have using a metal lathe. Not impossible, just not very likely.
One thing I have read while researching this is mention of sharpening the outer side of the tube. This will result in a larger hole than the patch.
I hope this helps someone make these useful tools. If enough people were interested I could write an article with more photos and maybe a short video.
Kim.


Comments
This is a terrific tip. Thank you for sharing this. I found some aluminum tube laying about and it worked a treat. For a minute. Aluminum isn't the metal for this! Ha! Too soft. Take care.
Log in or create an account to post a comment.
Sign up Log in