Arts and Crafts Bed Plans
An FWW contributing editor shows you how to cut a large project down to size. His router templates will help you create smooth curves and tight joinery. Read step-by-step instructions and buy a plan and cutlist.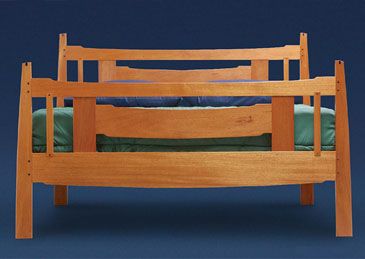
Synopsis: Building a bed requires working in a larger scale than most woodworkers are accustomed to. With detailed project plans and useful instruction, Gary Rogowski breaks down this bed project into several parts, making planning and assembly more manageable. Build from the outside in, he says: posts and long rails first, then vertical pieces and finally the center rails. This approach allows you to dry-fit the piece to get true dimensions for the internal members. He also shows how to build a router jig to cut the floating-tenon joinery.
Your mother was right. You do have to lie in the bed you made. I think you’ll find this more a blessing than a curse when you make this Arts and Crafts bed. The key is to be mindful that you’re building on a larger scale than is probably normal for you. Constructing a bed requires a different approach than a smaller piece does.
Breaking down this bed into its several parts will make planning and assembling it much more manageable. Working with a Y queen-sized mattress means you’ll be building a rectangular frame about 61 in. by 82 in. (includes extra space for bedclothes). The ends of this frame consist of another two frames, the headboard and footboard. So frame construction, albeit on a large scale, is all that faces you.
Build the headboard and footboard frames from the outside in: posts and long rails first, then vertical pieces and finally the center rails. Working your way in from the large to the small is an important tactic for this project: You will dry-fit the outside pieces to get true dimensions for the internal members. Later, the glueup will go in the reverse order, from inside to outside.
Full-sized drawings are invaluable
Certain design elements seem to fit quite naturally into this style of piece, such as the gently curved and tapered posts that meet the floor with a solid presence and the cloud lift, an element of Chinese furniture that Greene and Greene appropriated in the early 20th century. The cloud lift—a small S-curve, combined with a long, sweeping curve—appears in a few ways in this piece.
Texture in a piece is always important. I decided that inlaying raised strips of ebony in the post tops would give a stopping point for the eye and hand. The carved square plugs would do the same where I had pinned the joints. By stepping down the thicknesses of each adjacent part toward the center of the bed, I created shadow lines, another form of texture.
I finalized the design in a set of full-sized drawings. A full-sized drawing not only gives even better information about proportion, form, balance and negative space, but it also lets you plan out the details, seeing how they will work in the piece. I also use full-sized drawings to find graceful curves—bending a thin stick of oak, using a few weights to hold it in place, and tracing against it.
Because the headboard and footboard are symmetrical around their centerlines, I only had to make half views of each. Likewise, most of the template has to cover only half of the full profile.
From Fine Woodworking #156
For the full article, download the PDF below:
Fine Woodworking Recommended Products

Stanley Powerlock 16-ft. tape measure

Sketchup Class
Compass





Log in or create an account to post a comment.
Sign up Log in