Build a Bowsaw
Learn how to make and use a bowsaw, a classic hand tool that still has a place in the shop.

Synopsis: The engineering is ingenious on a bowsaw, and J. Crate Larkin explains in this article how to make and use this tool, which despite its primitive look serves many useful needs. He describes how to find, sharpen, and tension the blades and build your own wooden parts. A template is included in the article, as well as descriptions on building the brackets, stretcher, handle, knob, and key, and where to find a cord. Assembly directions are straightforward.
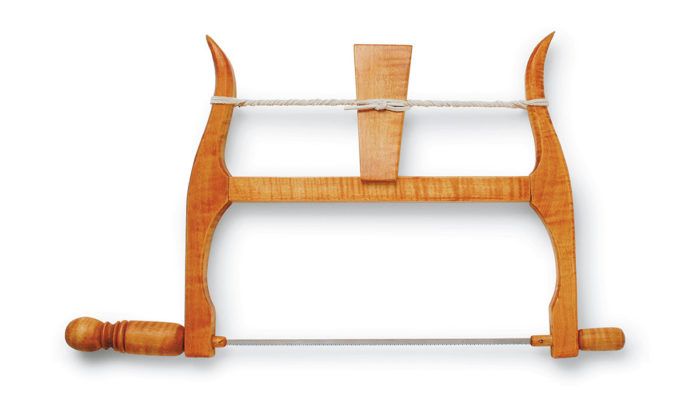
As a full-time woodworker, I have a lot of power-tool options in my shop. But there are occasions when it’s simply faster and easier to use a hand tool to get the job done. And one I reach for all the time is the bowsaw, a tool that’s been serving woodworkers for centuries. At first glance the saw might seem charmingly primitive. Yet the engineering is remarkably ingenious.
Over the years bowsaws have been made in various sizes. This one is an adaptation of several 18th-century English and Continental designs. With a 12-in.-long blade, it’s both compact and light, so it gets used in all sorts of ways. For example, it’s the tool I reach for when I need to crosscut a few parts quickly to rough length. I also use it like a scroll saw to cut curved shapes. The bowsaw also lends itself to cutting angles. And with the blade turned 90°, I sometimes even rip a board with the saw.
You can get the steel blade from a couple of mail-order outfits. The blade is available with either 8, 9, 12 or 16 teeth per inch (tpi). For most cuts, the 8-tpi or 9-tpi blade works just fine.
Tensioning the blade is easy. A thin, tapered piece of wood—called a key—twists a length of leather cord, which pulls together the top ends of the saw’s two long arms, called brackets. That action forces apart the bottom ends of the brackets, putting the blade under tension.
Start by making the wood parts
The bowsaw is made up of just six wood parts: the two brackets and the key, plus a stretcher, handle and knob. You’ll need about 2 bd. ft. of -in.-thick stock and an 8-in.-long piece of -in. square stock.
When the saw is assembled and tensioned, all of the parts end up under some stress, so it makes sense to use hardwood stock. Maple, birch or beech are good choices, but to make the saw look as nice as it works, I went one step further and used curly maple.
The brackets are first—Begin by cutting out two pieces of stock for the brackets. They’ll be cut to final shape on the bandsaw, so make them a little wider and longer than necessary.
Now transfer the bracket pattern (right) to a piece of heavy paper or cardboard. Cut the pattern to shape with scissors, then place it on the bracket stock and trace the profile with a pencil.
It takes just a few minutes to cut out the brackets on the bandsaw. Make the cut just outside the scribed line, then sand the parts to the line.
From Fine Woodworking #151
For the full article, download the PDF below:
Fine Woodworking Recommended Products

Suizan Japanese Pull Saw

Starrett 12-in. combination square

Stanley Powerlock 16-ft. tape measure


Log in or create an account to post a comment.
Sign up Log in