Two Versatile Miter Sleds
In this excerpt from his book "Basic Box Making," Doug Stowe shows how to make two tablesaw accessories that let you cut accurate miters in any size of workpiece.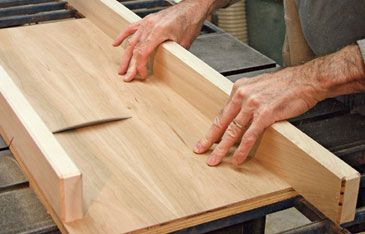
The first miter sled is used to cut wide stock and is designed for use with the blade tilted to 45 degrees. The second is a more common miter sled often used by craftsmen in cutting picture-frame parts. You’ll use it to cut trim and frame parts, and it may turn out to be the most useful tablesaw accessory in your shop. Both of these sleds offer greater safety and accuracy than a standard tablesaw miter gauge.
To make either sled, follow these steps:
1. Start with a rectangular piece of plywood and hardwood for the fences and the runners.
2. Use a 3/4-in.-wide dado blade in the tablesaw to make a dado cut 3/8-in. deep about 8 in. from the edge of the plywood. Plane the stock for the fence to fit in the dado. Alternatively, you can widen the dado cut to accept the stock you’re using for your fence. Aim for a fit that is snug.
3. To make the runners, plane hardwood stock to fit in the miter-guide slots in the tablesaw top.
4. Attach the first runner with a single screw and countersink it in place on the underside of the plywood base. Use a square to make certain that the runner is square to the edge you ran against the fence when you cut the dado. Holding the runner tightly in place, add two more screws.
5. Flip the sled base over and set the runner you just attached into the miter-gauge slot. Slide the second runner in place and use 1-in. drywall screws to attach it from above.
6. Attach the fences using 1-5/8-in. screws driven in from the underside. Don’t position any screws where they’ll interfere with the path of the blade.
Miter Sled for Wide Stock
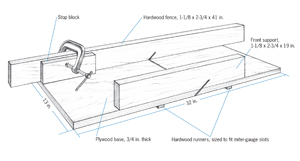
This is a smaller version of the crosscut sled many cabinetmakers use. The design is scaled to a size useful in box making, and unlike most sleds this one takes up little storage space when not in use. Used with a stop block clamped to the fence, you can cut multiple mitered pieces to exactly the same length. The sled’s reduced weight also allows it to move through cuts with less resistance.
To make this sled, follow the steps above.
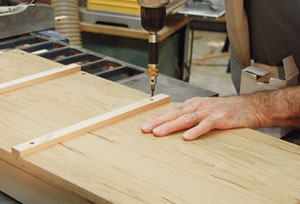
Attach front and back. Align the front and back fences with the edges of the plywood base, then countersink screws to attach them in place.
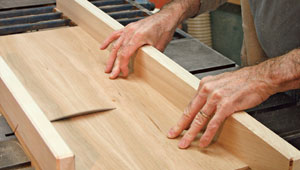
Make your first cut. An exact first cut allows you to measure from that mark whenever you’re using the sled. Also, you can use the sled to help set the blade angle later. Rotate the blade by hand through the kerf in the sled. If the blade scrapes at all, the angle of the blade should be adjusted.
Low Miter Sled
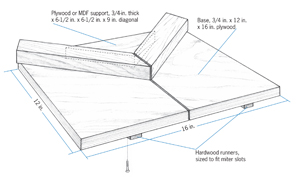
The sled shown here has been in regular use in my shop for many years–proof that this single sled is well worth the time it takes to make it. Used with the blade at 90 degrees, this sled works well for mitering low stock, making custom trim, cutting miter keys, and much more. As with other tablesaw sleds, stop blocks can be clamped to the fence to improve accuracy and cut parts that match exactly.
To make this sled, begin by following the steps above. When the runners are attached, place the sled on the tablesaw and mark the blade location, then use a square and pencil to extend the line of the tablesaw cut. Instead of adding a 90-degree fence, as is used with a crosscut sled, cut a 45-degree piece from a corner scrap of plywood or MDF (medium-density fiberboard). use a combination square to position the plywood over the mark where the saw will cut, then screw the corner into place. Take care to see that the screws aren’t placed in the path of the blade. If you don’t glue this piece in place, you’ll be able to disassemble it for future repairs. Cut two pieces of hardwood to act as fences, miter one end of each, then screw them in place so that their sides abut the plywood or MDF center piece. You’ll use these strips to attach stop blocks with C-clamps for cutting multiple parts to the same size.
 Excerpted from: Excerpted from:
Basic Box Making A book that helps you learn the art of box making from one of the foremost experts of the craft. You’ll learn the basic techniques tot get started as well as more advanced ways to approach finely crafted boxes. Includes eight complete projects. Browse all Books and DVDs |
Fine Woodworking Recommended Products
Hedgehog featherboards
Woodriver Circle Cutting Jig
Incra Miter 1000HD





Log in or create an account to post a comment.
Sign up Log in