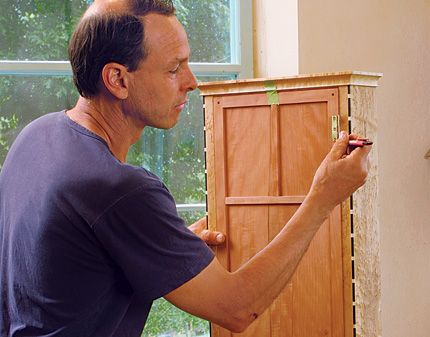
Learn Garrett Hack's technique for installing butt hinges that last the test of time.
Installing Butt Hinges
Learn Fine Woodworking contributing editor Garrett Hack’s time-tested technique for installing what is perhaps the most popular hinge style.
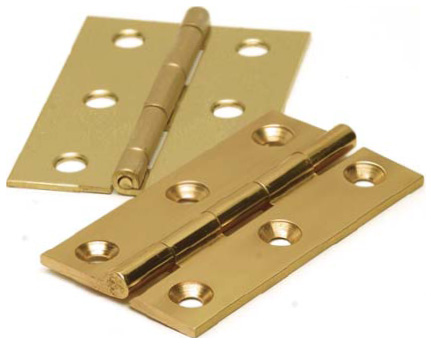 When it comes to searching out a hinge that offers durability, clean looks, and straightforward installation, Garrett Hack feels that “you can’t beat butt hinges.” While woodworking catalogs offer a wide variety of styles, finishes and sizes, when it comes to fine furniture, Hack opts for high-end brass hinges. Low-cost hinges are made by pressing thin sheet metal around the pin to form the knuckle, which results in a sloppy hinge action. The higher-end extruded hinges are much tighter since the knuckle is fitted together and then drilled in one shot for a more precisely fit hinge. And while steel is certainly stronger, brass hardware generally looks better on fine furniture, developing a pleasing patina over time.
Laying Out the Butt Hinge Mortise
Use marking gauges and a marking knife to make precise layout lines. Take all of your settings directly from the hinge for accuracy.
1) Lay out the width
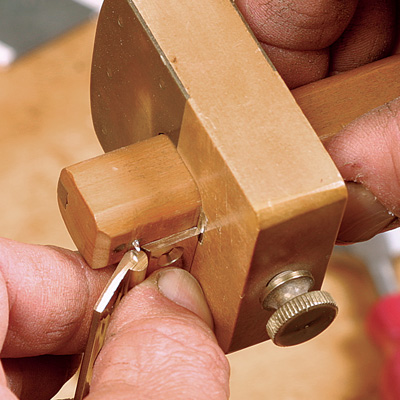 |
Set the first marking gauge for the width of the hinge. Set it about 1/32-in. short of the center-line of the hinge knuckle. The light pencil lines at the end of the mortise indicate where to stop the marking gauge cut. |
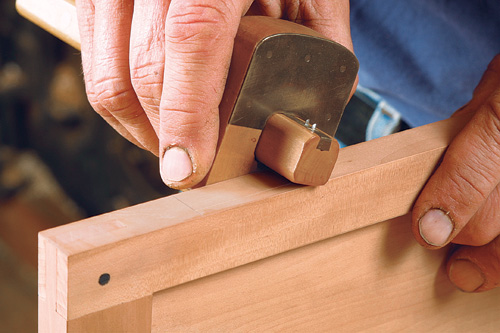 |
When laying out marks, set the mortise width slightly less than the width of the leaf to the center of the hinge pin, to make the pin and knuckle protrude just a bit.
At times, I mortise the case or the frame first, before they are glued, and then transfer them to the door later. It’s easier to work with case pieces loose on the bench than it is to wrestle with a large cabinet. The cabinet pictured here, however, is small, so I mortised the door first. |
2) Lay out the depth
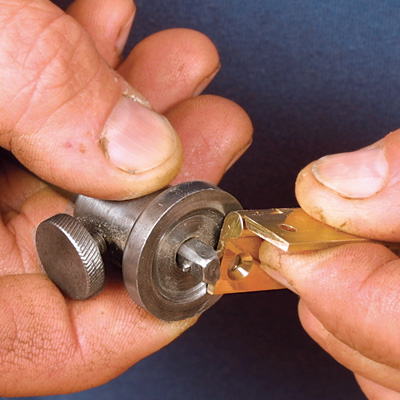 |
Set a second gauge for the depth of the mortise. If the hinge leaves are tapered, be sure to set the gauge at their thickest point. |
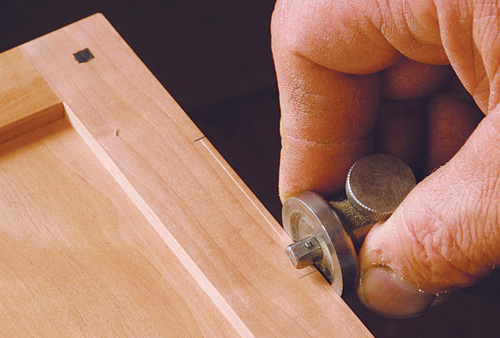 |
When making your marks, keep in mind that the goal is to produce very fine lines; heavy cuts will leave a less precise mortise.To see the knife marks more clearly, sharpen a pencil to a very fine point and drag it along your scribed lines.
For situations like the one seen here, where you’re marking so close to the edge of the stock, it’s much easier to use a smaller, specialty marking gauge made for finer work. |
3) Lay out the length
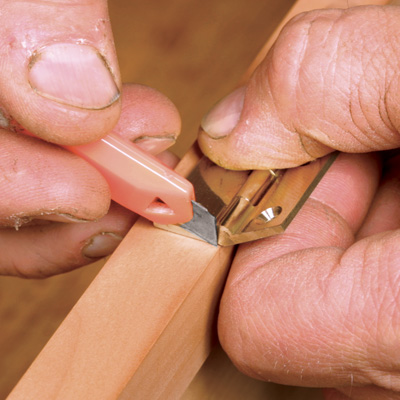 |
Again, use the hinge itself to set the length of the mortise. Holding the hinge in place, cut tick marks into the corner of the door stile. Then carry those lines across the mortise with a square. |
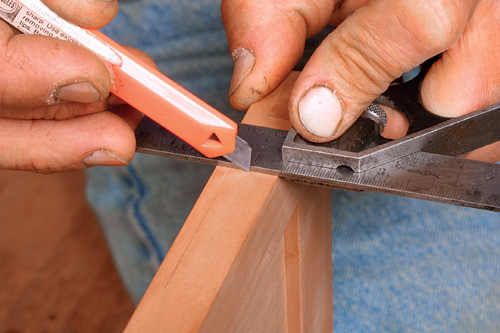 |
After scribing the width and depth with marking gauges, lay the hinge in position and cut a precise tick mark at both ends. For small cabinet hinges like these, the safest way to lay out the ends of the mortise is to extend these tick marks with a square.
For larger hinges, like those used in passage doors, it’s better to use the hinge itself to lay out the ends of the mortise. Just be careful the hinge doesn’t slip while you are marking. |
Cutting the Butt Hinge Mortise
Whether by hand or by machine, the idea here is to clear out the bulk of the mortise while staying clear of your layout lines.
1) Hog out the waste
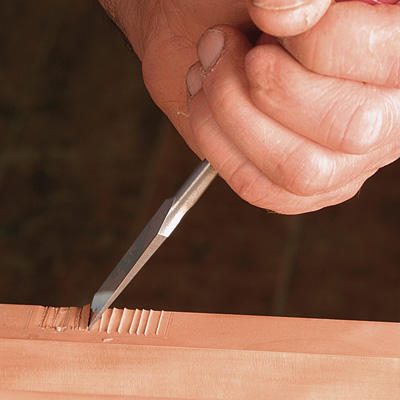 |
Chop it out with a chisel. Using a chisel, make a series of chopping cuts in one direction, then remove small chunks of wood by chopping in the other direction. |
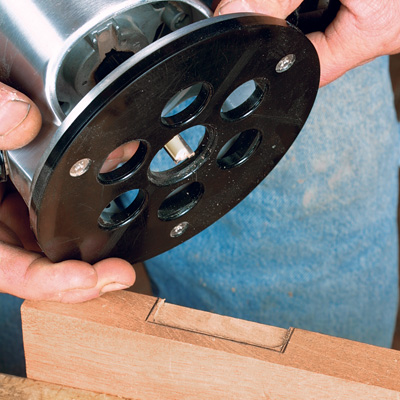 |
Or rout it out. Set the bit depth to the thinnest part of the hinge and stay clear of layout lines. For thin doors, you can clamp on an extra board to help support the router base. |
2) Fine-tune the mortise
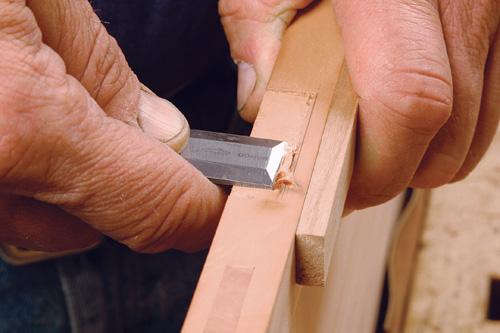 |
Finish off the mortise with a sharp chisel. Chop and pare gradually until you reach your layout lines and get a good fit. Save your widest chisels for the final cuts.
To protect your fingers and prevent blowout on the opposite side of the door, notice how Hack uses a small piece of scrap to back up the stock. |
Mark Butt Hinge Location on the Carcase
Cutting the mortises in the carcase is exactly the same as in the door stiles. The key to this step lay in properly transferring the door hinge locations.
1) Attach the hinges to the door
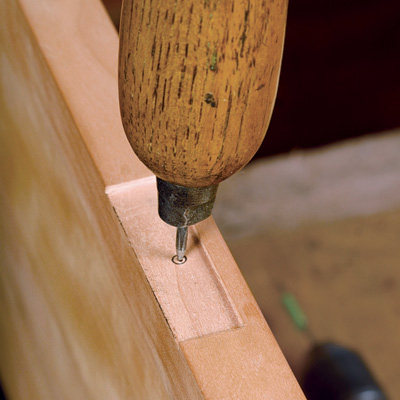 |
Mark for the center screw. Offset this location slightly toward the back of the mortise. This causes the hinge leaf to be drawn tightly into place, against the rear mortise wall. |
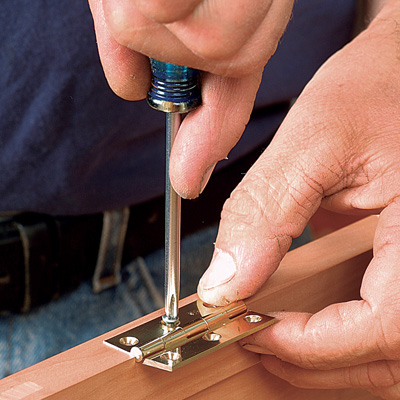 |
Drive in one steel screw. This leaves two hole locations unused to allow the hinge to be adjusted in or out later. Use a steel screw to avoid damaging your softer brass ones. |
2) Mark the case
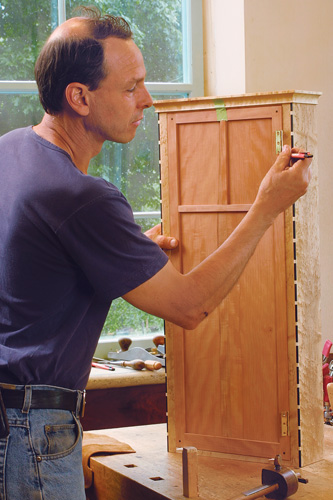 |
Transfer the hinge locations to the case. Cutting the mortises in the carcase is exactly the same as in the door stiles. To transfer the hinge locations from the door, slip or wedge the door into position with the hinge fully open and make fine knife lines along the top and bottom of the knuckle.
Quick Tip: A spare hinge of the same size makes it easy to test-fit the mortise and to mark the screw locations. Otherwise, you have to remove a hinge from the door. |
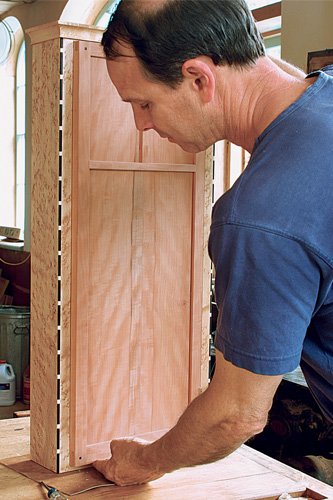 |
Installing the Door and Checking the Fit A typical problem is that the gap along the hinge line is too large or uneven. The solution is to mortise in one or both leaves of each hinge slightly deeper. Of course, the opposite can happen as well. At times, you’ll need to shim a hinge either up or out.Cut the mating mortises and attach the door. Use the same techniques you employed for the the door mortises and continue to use only one steel screw at this point. Check the fit of the door. If necessary, remove the door and plane it to fit. |
For more tips on building solid doors for your furniture, be sure to have a look at Andy Rae’s free download on Building Doors and Drawers.
Quick Tips on Final Butt Hinge Adjustments
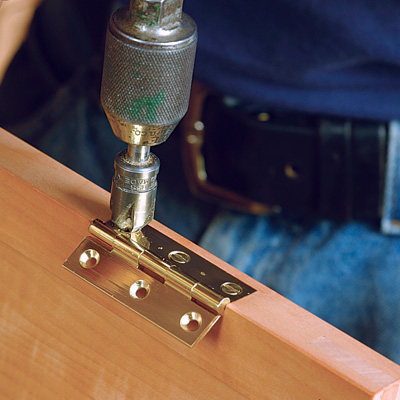 |
Adjust the countersinks. One of the final steps to fitting the hinges is setting the screws. Each hinge is drilled and countersunk for a specific size screw, which is often noted in the catalog description.
If the countersinks are not deep enough, the heads of the screws will stop slightly proud of the hinge leaf. This can cause a hinge to bind and exert leverage on the screws. If necessary, deepen the countersinks so that the heads end up just below the surface of the leaf. |
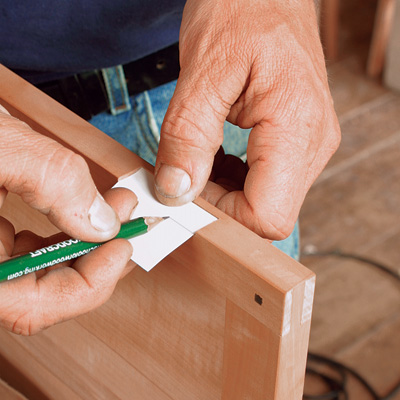 |
Make fine adjustments – shimming up. If you’ve cut too deep, you’ll want to shim a hinge outward by trimming a card to fit into the bottom of the mortise. |
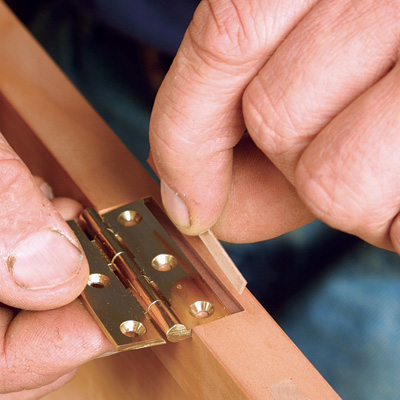 |
Make fine adjustments – shimming out. If you’ve cut too wide a mortise, you’ll need to move a hinge out toward the front of the case. Plane a sliver of long-grain wood to fill the gap at the back of the mortise. Glue it in and plane it flush for an invisible repair. |
If your hinges are installed correctly, your doors and lids should swing sweetly for many decades to come.
More to Come
Be sure to check back in the coming weeks for the second installment of our hinge guide. Next up: knife hinges. And for more information on Garrett Hack’s method for installing butt hinges, be sure to consult his article from FWW issue 159.
For more help with hinges, check out:
- Choosing Door Hinges
- Perfect Hinges Every Time
- Flawless Hinges in Fine Furniture
- Wooden Box Hinges
- Knife Hinges on the Router Table
- Barbed Hinges for Fine Boxes
- Quadrant Hinges Elevate Any Box
- Best Hinges for Built-ins







Comments
Garret Hack is amazing craftsman and it is always an education to see how he does something. But mortising the doors is the easy part. Why isn't there one picture of cutting the mortise in the cabinet frame. How do you get that router inside up against the top and the bottom?
For the quality of Garret's work the thick brass hinges may be the right choice. But on light doors for most cabinets, the ones from Ace hardware with or without ball ends are more than sufficient. I'm willing to bet they have a service life almost as long and at a fraction of the price. Heavier is not always better.
I also think the method where you only mortise the doors for the hinges and surface mount the hinges on the frame is under appreciated. Using the thinner pressed hinges you probably aren't mortising the door any deeper. Yet it reduces the work by half, improves alignment and allows you to inset doors from the plane of the face frame.
I may be the only one, but "fine" doesn't always mean doing things the hard way. I would encourage the magazine to show alternate ways to achieve the same thing.
Peter
Peter:
Your comments open up an excellent debate. As someone who has played around with both less expensive stamped hinges as well as higher end (like Brusso) solid brass hinges, I've always felt that the cheaper models have way too much slop in them - something Garrett referred to in the article. He - and I usually - opt for the solid brass models since the stamped metal isn't simply wrapped around a pin but rather, after the two leaves are made, they're fit together and then the pin hole is drilled through - leading to a much tighter fit.
Also, you may have missed it (this is a pretty long post) but he does refer to mortising the case - the same way he mortised the door. He goes on to say that in cases where you're just not going to be able to fit a trim router or chisel into the case for mortising, this step should be done while the piece is still in component pieces.
hope that helps - but let the "Great Hinge Debate" begin!!
Cheers to you,
-Ed Pirnik
FWW Web Producer
Peter,
I have felt the pain of expensive hinges many times. And I wouldn't be surprised if stamped, non-mortise hinges from a hardware store were extremely durable. However, neither point would sway me away from buying pricey, solid brass hinges for my cabinets. Here's why. They look better. (I suppose I should add "at least in my opinion" to satisfy those who think beauty is only in the eye of the beholder. I'm not one of them, though.) After spending a big chunk of money on lumber that I took great pains to pick out, and then spending a lot of time selecting grain for every part, milling them all with the greatest care, carefully cutting joints, lovingly prepping the surface for a finish, and finally putting a finish on, I simply cannot buy unattractive hinges to save a few bucks. Money isn't the most important thing. Beauty is.
Ed and MKenney
Stamped hinges aren't necessarily cheap or bad. Open the door to almost any office or house and you are exercising a stamped hinge. They can be heavy. They can be costly. They can be very precise. The method of manufacturer doesn't necessarily make a hinge cheap, sloppy or bad looking.
Most cabinet doors aren't very heavy and you don't really need 1/8" thick brass leaves to support them. The trick is to find the appropriate scaled solution to the problem. Among the options out there and I don't think most people can feel the difference in operation between the fancy extruded butt hinges and the less expensive one. They both work. They both look good.
My other point is that mortising both door and frame adds to the complexity of making a cabinet for a limited aesthetic pay back. Just because heavy house door hinges are mortised into the frame, doesn't mean the only way to go is copy the practice on much, much lighter doors. Mortising almost the depth of the hinge into only the door greatly simplifies hanging doors, particularly when set back from the face frame. The fact that the barrel of the hinge is not centered on the crack will scarcely be observed.
We all value different things. I believe there are better way to show craftsmanship, and expend limited time than mortising overly heavy butt hinges into a frame, just for the sake of doing it. And although I can afford the cost of extruded brass hinges, I don't find them appropriate or worth the expense. Which is probably why I've never wanted to own a Porche.
Peter
The case must be mortised as well.
It's simply the proper way to do things.
You can argue of course its technical merits: stronger, holds alignment forever, etc.
However, the reality is, that it is simply the proper way to do things, for when you open that door and see/feel the hinge leaf just sitting on the surface even a non purist can tell that something is wrong.
Building fine furniture is rarely about finding the easiest way.
Nor should we seek out ways to make things overly "prescious"
Somwhere in that dangerous middle ground is the right way to do things and often it is about meeting the expectations of a shared consciousness, tradition if you will.
And that is the real reason why we mortise cases, cut dovetails by hand, and a host of other things that keep the really important traditions alive - like woodworkers rarely earning what they are worth.
The "one steel screw" trick reminded me of another one. Driving steel screws, of the same size as the brass screws you are using, into each hole first, threads the wood. Then when you replace them with brass screws there is less chance of twisting off the soft brass head.
Speaking as a weekend hobbyist who has only built one houseful of furniture, I used to consider hinge installation to be successful when the gap between the door and the cabinet is small and uniform all the way around, a skill I that took a long time to learn, and a skill that I would like to improve upon through better techniques.
If it wasn't for articles like this, I would never know how badly I messed up some of my more advanced projects by not using solid brass hinges, and (dare I say it), by actually using non-mortise hinges.
Thanks FWW!
Nice article.
But what the heck's a "hunge"?
I have followed Garrett Hack's methods here since mounting my first butt hinge set over 50 years ago. I have, however, learned a few other tricks, born out of absolute frustration.
What isn't mentioned here, but is key to correct hinge installation, is that when mounted, all hinge pins must be perfectly aligned on a single imaginary line drawn through the centers of their pivots. If they are even slightly out of line from each other, hinge problems will eventually occur. Pins will work their way out, as if by magic. Fine metal dust will appear somewhere. This problem is magnified when the door needs 3, 4, or 5 hinges, and with seasonal humidity changes.
I am not especially exacting, as my handle indicates, but I do care about how my doors swing.
I have found many errors of this type on other craftsmen's work. I've learned to look for this just like I look at the quality of joinery when I study other's work. It is a silent testimony that none of us are perfect.
Without regard to the quality of the hinge, here is the method I use to solve this problem. I have numerous convenient lengths of straight aluminum (and steel) bar stock, bought from hardware stores, in which I have drilled and tapped holes at the correct position to hold the hinges in perfect alignment. Extruded angle works too. I use flat-head machine screws to hold the hinges to the bar. This costs almost nothing compared to the cost of the cabinet, by the way.
When I frist started this method, and from time to time even now, I use a second bar on the opposite leaf to make certain the mechanical action is perfect (through the entire swing) before I get near the doors. I also used 2 screws per hinge, but now I sometimes use 1 screw and a tiny piece of double-stick tape to save time.
With only one bar attached, the hinges can be held to the door and knife cuts used to strike the positions for the mortises. I only use a gage for mortise depth. Check the mortise position and depth with the hinge folded in different positions. This is where hinge quality makes a difference, but even the very expensive ones can show variations.
Using this method provides other valuable information, such as the center hinge in a 3 set needing a variation of the mortise depth. It is also possible to see very slight variations in the straightness of the door. Differences significantly smaller than 1/28 inch can cause significant problems. Sometimes one or more hinges in a set may need the mortise slightly deeper on one side than the other. I mortise for the hinge to be slightly proud and then sneak up on the perfect depth with a sharp chisel.
This method has, for me, eliminated Garrett's shimming steps; I haven't shimmed hinges for many years.
Once the hinges are mounted on the door and the mechanical action is perfect, the bar comes off, and the door performs the same function as the bar when striking the frame for mortises.
This may seem like extra work, but it makes hanging doors so much simpler and faster, I can't imagine doing it any other way. And even cheap hinges will work great, although they don't always look great.
And one other difference I have with Garrett (who, by the way, is obviously a vastly superior craftsman than I, and one for which I have great respect), I use VIX bits to drill the screw holes. Every other method I tried led to mispositioned screws and resulting problems. Vix bits eliminate grain misdirection. These bits also eliminate parallax errors caused by my less than perfect eyes. I also liberally apply beeswax to all brass screws before assembly.
Other errors made by craftsmen are (1) they often use too few hinges; (2) Or they try to straighten a slightly bowed door with hinges. We spend a lot of time and money doing this, why not do it correctly? I remember vividly the first time I "disassembled" a tall paneled cabinet door that I noticed was slightly bowed after assembly and finishing. I kept the panel, as it was fine, but cut new styles and rails. I look at this door almost every day, and open it almost as often, and the satisfaction of having it right far exceeds the pang in my heart as I destroyed the bad one.
Toward more fun in the shop...
Depending on the project, I do use stamped hinges occasionally.
Very good article.
I'm surprised there is no photo of the finished job.
Ed
ive always shy away from recess hinges 4 they always end up not fitting rght. thanks now i can practise as the masters dose. it a wonerdful way too practise patience and a wonderful skill
Great article. I'd say that Peter's incorrect spelling of Porsche perfectly demonstrates that he's comfortable with a less than exacting approach.
Log in or create an account to post a comment.
Sign up Log in