Craftsman Door Made Modern
Designed for projects requiring ventilation, Robert Webb's doors are fun to build and offer a number of valuable woodworking lessons.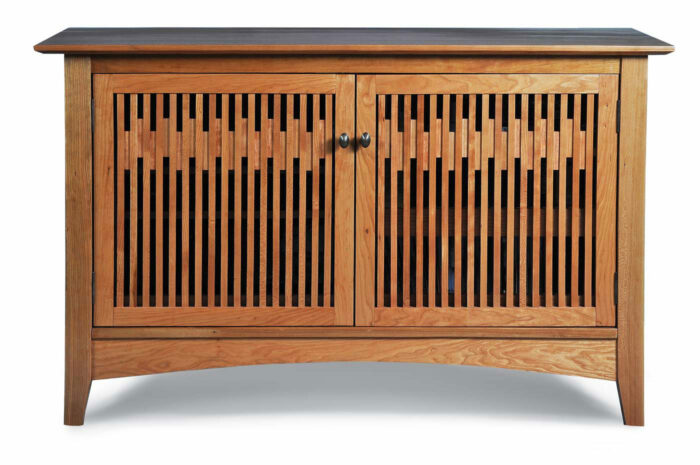
Synopsis: Robert Webb needed to house stereo and TV components, and so he decided to build a Craftsman-style cabinet. To allow sound and heat to escape—and remote-control signals to enter—he designed the doors with vertical spindles rather than solid panels. Instead of chopping lots of mortises into the rails, he cut grooves in the rails and inserted notched strips into them-creating mortises without mortising. In this article, he provides detailed instructions on the entire process, including adding decorative filler blocks.
I recently built a Craftsman-style console to house stereo and TV components, and I wanted the cabinet to be both beautiful and functional. To allow sound and heat to escape—and remote-control signals to enter—I traded solid door panels for vertical spindles common to the Craftsman style. To add visual interest, I inserted filler blocks between the spindles in a wavelike pattern.
This door design is especially helpful wherever ventilation makes sense—for a stereo cabinet like mine, or for kitchen cabinets, a bathroom vanity, a mudroom cabinet, a wine rack, or a closet. But it has a modern, minimalist style that will work in lots of places.
You can vary the size and spacing of the spindles, and there are a number of design possibilities for the filler blocks. While Craftsman-style furniture is traditionally made with quartersawn white oak, this contemporary take looks good in lots of woods. I went with cherry.
These doors are also fun to build, and they offer a number of valuable woodworking lessons.
Brief tour of the construction
 The door frames are reinforced with deep mortise-and-tenon joinery, ensuring they will stay square and swing freely for decades to come.
You can cut the joints however you like. I cut the mortises using the simple router box described in Bob Van Dyke’s article in FWW #303 (“Quick and Accurate Mortises”), with the help of a plunge router and a spiral upcutting bit. I formed the tenons on the table saw using a stacked dado set.
 The spindles are where things get interesting. I’ve learned in the past that you don’t want to mortise their full thickness into the rails. If you do, you’ll inevitably have small gaps, either right away or in the future, and viewers will be able to see down into those. The gaps will also trap dust. Instead, you want to cut short tenons slightly smaller than the spindles. The small tenon shoulders will hide the joints.
Chopping dozens of equally spaced mortises in the rails would be tedious to say the least. My approach does away with mortising altogether. Instead, I cut grooves in the rails and insert notched strips into them—forming mortises without actually mortising. This approach is not only straightforward but also versatile, and it can be used for vertical or horizontal spindles of any size.
As for the decorative filler blocks, those are glued into place after the door frames and spindles are assembled.
| From Fine Woodworking #315
To view the entire article, please click the View PDF button below. |
 |
Fine Woodworking Recommended Products

Olfa Knife
Freud Super Dado Saw Blade Set 8" x 5/8" Bore
Leigh Super 18 Jig






Comments
This console cabinet is exactly what I’ve been looking for. Does anyone have any ideas about where I could get plans? I’ve built end tables, but this is more than I want to try to figure out by myself.
Cathy: I would love to send you my original project proposal that I submitted to FWW which discusses the entire build including the doors. Included are dimensions and build photos. If you send your email address to Betsy Engel at FWW, I will send you my word document. Cheers, Rob
Rob - Wow, that’s incredibly generous!
I sent FWW support an email asking them to forward my email address to Betsy Engel.
Hi Cathy - Since I haven't rec'd an email yet, you can send it to fw@taunton.com . --Betsy
Done. Hopefully they pay attention. If no response by the end of the week I will try a phone call. Thank you for following up.
Original proposal sent. RJW
Log in or create an account to post a comment.
Sign up Log in